
Hello, fellow cardmakers and festive enthusiasts,
As the holiday season approaches, it’s the perfect time to colour your own Christmas card. Bringing your creative visions to life with digital stamps and colouring pages adds a personal touch to your holiday greetings.
These tools offer endless creative possibilities, making it easy to design unique and memorable Christmas cards.
In this tutorial, we’ll learn how to use the “Rory Bake Time” colouring page from Colour of Love to create a charming Christmas card. This delightful image captures the essence of holiday baking and adds a festive touch to your card design.
I created this card for the new challenge on Penny’s Paper-Crafty Challenge blog, where the theme is “Anything goes using paper. Special thanks to our sponsors, Colour of Love and Odynetika, whose logos are below.


Odynetika
Shop doesn’t exist any more (noted September 2025)
Explore how to transform this adorable colouring page into a beautiful Christmas card. Let’s get crafting!
- Overview of the Colouring Page Rory Bake time
- Materials and Tools
- Colour Your Own Christmas Card with Rory Bake Time in a Step-by-Step Tutorial
- Let’s Get Creative Together!
- Products used
- I would like to enter my card in the following challenges:
Overview of the Colouring Page Rory Bake time

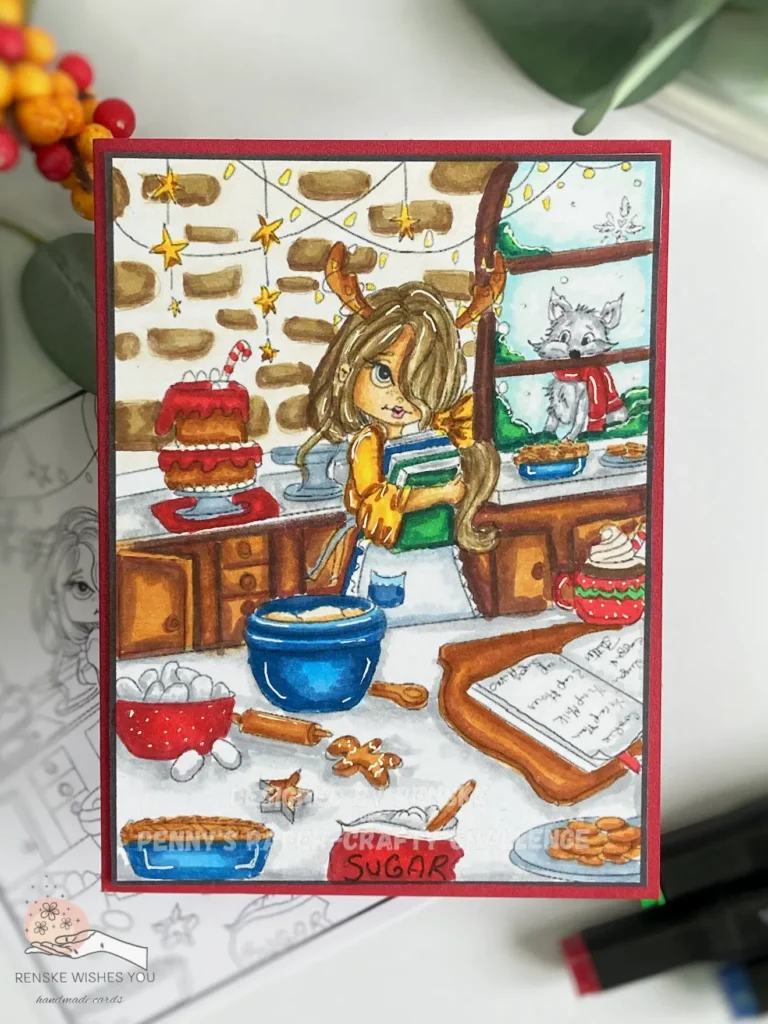
The “Rory Bake Time” digital stamp from Colour of Love provides a charming depiction perfect for holiday card-making.
This detailed stamp features a warm, inviting scene with a woman engaged in festive baking. Surrounding her are elements that capture the essence of Christmas cheer, making it a delightful choice for your card.
- The Scene: The digital stamp portrays a woman in a cosy kitchen, holding books and surrounded by various holiday baking items. The scene includes a window with a cat peeking through, snowy bushes outside, and a kitchen adorned with festive decorations like hanging stars. The counters are filled with baking essentials—eggs, mixing bowls, a rolling pin, cookies, and a steaming mug of hot chocolate. This detailed setting adds a heartwarming touch to any Christmas card.
- The Appeal: This digital stamp stands out for its detailed, festive design, making it ideal for creating unique and personalized holiday cards. The baking elements and cosy kitchen scenes evoke a sense of warmth and celebration, which is perfect for conveying the holiday spirit. The intricate details offer plenty of colouring opportunities, allowing crafters to add their personal touch and creativity.
Question for you!
I would love to read your thoughts on the “Rory Bake Time” digital stamp!
Which elements of the scene do you think resonate most with the festive spirit? Is it the cosy kitchen, the festive decorations, or the treats? Share your ideas and inspirations in the comments below. Your feedback and creativity make our card-making community vibrant and inspiring!
Feel free to share your ideas and inspirations in the comments below. Your feedback and creativity help make our card-making community vibrant and inspiring!
Materials and Tools
Here’s a detailed list of the materials and tools needed for holiday card-making, including how to use the Rory Bake Time digital stamp to make your own Christmas card! I included their purposes and alternatives for those who might not have the exact items on hand:
- Digital Stamp: “Rory Bake Time”
- Purpose: The main image for the card, which you print and colour to create a festive scene.
- Alternatives: Other digital stamps from Colour of Love or similar designs from different stamp providers. You can also consider hand-drawn images or printable colouring pages available online.
- Alcohol Markers
- Purpose: Used to colour the colouring page, providing vibrant and smooth colour application.
- Alternatives: If alcohol markers are unavailable, consider using coloured pencils or brush pens for a different texture.
- White Gel Pen
- Purpose: Ideal for adding highlights, and details, and enhancing certain areas of the card, such as snowflakes or reflections.
- Alternatives: White ink pens, white paint pens, or a white coloured pencil.
- Red Card Base
- Purpose: Serves as the main base of the card, providing a festive background that complements the coloured digital stamp.
- Alternatives: Other holiday-themed colors like green or gold, or patterned cardstock for a different look.
- Luxe Paper Block Christmas
- Purpose: Used for the sentiment on the inside of the card
- Alternatives: Any sentiment you like. It can be with stamps, die-cuts, or stickers.
- Scissors
- Purpose: Used to cut the coloured image.
- Alternatives: Craft knives or paper trimmers for more precise cuts.
- Glue
- Purpose: To attach the coloured digital stamp to the card base and secure any additional embellishments.
- Alternatives: Double-sided tape or glue dots for a different application method.
Feel free to mix and match these materials and tools based on what you have available. The key is to adapt and find creative solutions to achieve a beautiful and personalized Christmas card.
Colour Your Own Christmas Card with Rory Bake Time in a Step-by-Step Tutorial
In this section, I will take you through a step-by-step guide on how to colour your own Christmas card using the “Rory Bake Time” digital stamp from Colour of Love.
You’ll find clear instructions and helpful tips for each step. From printing and colouring to assembling your festive creation, this guide will help you craft a personalized and charming Christmas card that showcases your creativity.
Let’s start colouring and create a card that captures the joy and warmth of the holiday season!
Step 1: Printing and Preparing the Digital Stamp for this Christmas card tutorial
To start, prepare the “Rory Bake Time” digital stamp for colouring and card-making. Follow these guidelines for a smooth and effective process:
1. Print the Digital Stamp
Print the ‘Rory Bake Time’ digital stamp from Colour of Love to start creating your DIY Christmas card. It’s important to choose the right paper to ensure that the image details are clear and suitable for colouring. For this project, use DCP paper, which is perfect for alcohol markers. This paper type helps prevent bleeding and ensures vibrant colours.
2. Adjust the Size
Ensure the printed image fits well on the card you plan to create. For this tutorial, the final dimensions of the printed image should be 9.7 cm by 13 cm. Adjust the print settings as needed to achieve the correct size, while maintaining the image’s clarity and detail.
3. Paper Type Matters
If you’re using alcohol markers, DCP paper is a great choice. However, if you prefer other colouring mediums like coloured pencils or watercolours, you might need a different type of paper. Choose a paper that matches your colouring tools to get the best results.
4. Check the Details
Before you start colouring, check all the details in the digital stamp are visible and clear. This ensures that you can colour the image accurately and that every part of your design will look as intended on your finished card.
By following these steps, you’ll set yourself up for a successful colouring session and a beautifully crafted Christmas card.
Step 2: Coloring the Image with Alcohol Markers
Colouring the “Rory Bake Time” digital stamp is where the magic truly happens, bringing your card to life with vibrant hues and festive cheer. Here’s a step-by-step guide to help you achieve a beautifully coloured image using alcohol markers.
Gather Your Colors
Use the following colour combinations to colour the details in the digital stamp. For best results, choose alcohol markers similar to those from Decotimecrafts. Apply the three-tone technique—dark for shadows, medium for blending, and light for highlights—to ensure a seamless blend with no harsh lines.
- Skin: Tanned Skin (260), Peachy Blush (259), Salmon Pink (25), Pale Cream (142)
- Hair: Pale Cream (142), Brown Grey (104), Walnut (100), Clay (116)
- Window Glass: Cool Shadow (178), Frost Blue (182)
- Cat: Cool Grey 5 (CG5), Cool Grey 4 (CG4), Cool Grey 3 (CG3), Cool Grey 1 (CG1)
- Red Elements: Cardinal (244), English Red (249), Burgundy (247)
- Blue Elements: Baby Boy (144), Midi Sky (190), Dark Sky (191)
- Bowls: Blue Grey 5 (BG5), Blue Grey 3 (BG3), Blue Grey 1 (BG1)
- Book and Eggs: Cool Grey 4 (CG4), Cool Grey 3 (CG3), Cool Grey 1 (CG1)
- Wall Stones: Brown Grey (104), Walnut (100), Clay (116)
- Wall Between Stones: Pale Cream (142), Pearl White (109)
- Cookies: Sand (107), Rose Beige (97), Barn Red (245)
- Stars: Lemon Yellow (35), Golden Yellow (222), Barn Red (97)
- Frame: Bronze (99), Natural Oak (91), Burnt Sienna (91)
- Both Aprons: Cool Grey 5 (CG5), Cool Grey 4 (CG4), Cool Grey 3 (CG3), Cool Grey 1 (CG1)
- Green Stripe on Mug: Grass Green (47)
- Girl’s Blouse and Bow: Lemon Yellow (35), Golden Yellow (222), Barn Red (245)
- Kitchen: Sand (107), Rose Beige (97), Burnt Sienna (95), Bronze (99)
- Apron: Blue Grey 5 (BG5), Blue Grey 3 (BG3), Blue Grey 1 (BG1)
- Stars: Lemon Yellow (35), Golden Yellow (222), Barn Red (245)
- Cream on Mug: Chai Latte (19), Pearl White (109)
- Sugar: Cool Grey 3 (CG3), Cool Grey 1 (CG1)
- Bushes Outside: Grass Green (47), Forest (50), Dark Green (51)
- Rolling Pin, Spoon, Star Cookie, and Doll Cookie: Sand (107), Rose Beige (97), Barn Red (245)
Colour the Image
Start with the darkest colour in each area to create shadows and define the contours. Use the medium colour to blend the darker shade and fill in the main areas with colour. Apply the lightest colour for highlights and smooth out any remaining harsh lines.
Tip for Beginners: If you’re just starting with alcohol markers, consider beginning with your lightest colour. Apply the light colour over the entire area first. Then use your medium color for shadows and finally the darkest color. Blend back with medium and light colours to achieve a smooth transition.
Add Highlights and Details
- Use a white gel pen to add highlights to areas such as the hair and bowls, bringing out shine and texture.
- Add white dots to the bowl with eggs and the mug with cream for added detail.
- Redefine any unclear text, like the word “Sugar” on the sugar bag, using a black fine liner for clarity.
- Add white lines to the cookie character’s features, including eyes, nose, and mouth, to enhance its charm.

By following these steps, you’ll create a beautifully coloured image that captures the festive spirit and showcases your creativity
Step 3: Assembling the Card with a Focus on Cutting, Mounting, and Adding Personal Touches
Now that you have your coloured image ready, it’s time to assemble your card and add those final personal touches. Follow these steps to complete your festive creation:
Cut Out the Coloured Image
Carefully cut around the black outline of the coloured image. Aim to stay as close to the line as possible to ensure the details are clear and sharp.
Prepare the Card Base
- Create a red card base that complements the colours used in your image. The dimensions of the coloured image are 9.7 cm by 13 cm, so you will need a slightly larger card base. Cut a piece of red cardstock to 20.4 cm by 13.5 cm.
- Score the cardstock along the long edge at 10.2 cm to create a fold. This will give you a card base that measures 10.2 cm by 13.5 cm, providing a perfect frame for your coloured image.
- Attach the coloured image to the red card base using glue or double-sided tape. Make sure it’s centred and securely affixed.
Add an Inside Insert
To make the inside of your card look polished, cut a piece of white paper to 9.7 cm by 13 cm. Attach this white insert to the inside of the card base. This provides a clean space for writing your message.

Add a Sentiment
For a finishing touch, add a sentiment to the inside of the card. I used a charming sentiment from an old Luxe Paperblock by Decotimecrafts. It features a sign with “Warm Wishes” and a festive “Merry Christmas” message. Place the sentiment in the centre of the white insert on the inside of the card, positioning it to complement the space and make it easy to write your message.
Final Touches
Since the front of the card has a detailed scene, I opted not to add text there. The inside provides a perfect space for your personal notes. This approach keeps the front clean while ensuring your message is prominent and heartfelt.

You’ve now completed your card with a polished and personal touch. Ready to spread holiday cheer!
Let’s Get Creative Together!
What a journey we’ve been on! From printing the ‘Rory Bake Time’ digital stamp to creating a unique holiday card, we’ve turned this festive colouring page into a beautiful Christmas card.
We started by carefully selecting our paper and adjusting the size to ensure our image would fit perfectly on the card. Next, we brought the image to life with vibrant colours, blending and shading with precision. Finally, we assembled the card, adding a personal touch to the inside with a heartfelt sentiment.
The process was both fun and rewarding, and I hope you enjoyed every step as much as I did. Your card is now a reflection of your creativity and holiday spirit—ready to make someone’s day a little brighter!
Join the Challenge
Feeling inspired? Join the Penny’s Paper-Crafty Challenge and showcase your own creative card! Click the button below to enter the challenge and see what other crafters are creating.
More Cardmaking Inspiration with Colouring Pages
Looking for more ways to express your creativity? Check out these related blog posts for additional colouring pages and cardmaking ideas:
Thank you for joining me in this creative adventure. I can’t wait to see what you create next!
Happy Crafting!
Products used
Affiliate Disclosure: This post contains affiliate links, which means I may earn a small commission at no extra cost if you purchase through these links. I only recommend products and services that I use and trust. Your support helps me continue to provide free tutorials and creative inspiration. Thank you for supporting my blog and helping me to keep sharing my passion for card making!
Affiliate products used
White gel pen 08

Artemio Paper Trimmer

Products without affiliate links
- Alcohol markers from Decotimecrafts (bought at ActionNL)
- Red Card base from Aveccreative (bought at ActionNL)
- Luxe Paperblock from Decotimecrafts (bought at ActionNL)
- Scissor from ActionNL
- Sticky Glue from ActionNL
I would like to enter my card in the following challenges:
- A Place To Start: Anything goes
- Krafty Chicks Challenge: Stamps
- Lil Patch of Crafty Friends Challenge …: Anything goes
- The Paper Players: Colour challenge (red, yellow and blue)
- We Love Stamping: Hand coloured image
- Peace On Earth Christmas: Anything goes
- The 12 Months of Christmas Link Up: Anything goes
Very nicely colored! Thanks so much for sharing with us at A Place to Start!
Hugz,
Chana Malkah, Owner
Thank you
Great image and colouring. Thank you so much for joining us in our challenge at We Love Stamping. Good Luck and I hope you will join us in our next challenge.
Faith A DT
Thanks a lot
Fun and colorful. Love the image and scene you created, Thanks for sharing at Lil Patch of Crafty Friends.
Thank you
What a wonderful and detailed image and gorgeous colouring. Thanks for your detailed description and for sharing it with us at we love stamping. It is so nice when entrants join in with the theme. Thank you xx
Thanks a lot for your lovely comment
Renska… Your coloring on Rory’s Bake Time coloring sheet is wonderful. I really appreciate the lesson on coloring sheets, I have never tried one. Truly a delightful Christmas card. Thank you for sharing your creativity with The Paper Players.
Thanks a lot of your lovely comment. I am glad to read you appreciate the tutorial.
Fun image and great coloring! Thanks so much for joining in the fun at our Peace On Earth challenge! Good Luck and we hope you’ll come back often.
Darlene
DAR’S CRAFTY CREATIONS
Co-Owner … Can You Handle the Pressure, Double D, Four Seasons, Peace On Earth, Stencil Fun, Simply Clean & Simple, Two Old Bats, Triple B, Word Power, Love Those Pretty Papers
Thank you
A fantastic card. The colouring is awesome. Thanks for joining us at A Place To Start. Hugs, María.
Thanks a lot