
Crafting a card with a personal touch makes a difference when sending encouragement. If you need a heartfelt way to uplift someone, a coffee-themed card is ideal. Imagine the smile on a friend’s face as they open a card celebrating their love for coffee and offering a warm message.
In this tutorial, I’ll guide you through creating a coffee-themed encouragement card using digital stamps and papers from Polkadoodles. You’ll explore effective techniques to bring your card to life, making it a treat for anyone who receives it.
Let’s get started and turn those crafting supplies into a charming card perfect for sending a bit of cheer and warmth.
- Gather Your Essentials for this Coffee-Themed Card
- Crafting Your Coffee-Themed Card Step-by-Step
- Why Coffee-Themed Encouragement Cards Work
- Let’s Get Creative Together
- Polkadoodles products in the Spotlight
- I would like to enter my card in the following challenges:
Gather Your Essentials for this Coffee-Themed Card
Start by gathering the materials for your coffee-themed encouragement card. Here’s what you’ll need, divided into Polkadoodles products and other essentials. Affiliate links to the Polkadoodles products are included for convenience.
Polkadoodles Products
- Barista Coffee/Cake Digi Stamp: This charming digital stamp features a delightful coffee theme, perfect for adding warmth and personality to your card.
- Paper Heaven 1 – Horace and Boo Digital Paper Set: This set provides a variety of patterned papers that beautifully complement the coffee theme.
- Coffee and Cake Sentiment Set: With sentiments like “Life happens, coffee helps” add a personal and encouraging touch to your card.
Other Materials
- Square Die: Cutting precise shapes and adding a professional finish. Alternative: Use a paper cutter or scissors to cut out shapes manually.
- Square Die with Rectangular Edge: This creates a layered look with a unique edge detail. Alternative: Use a standard die with a decorative edge or cut out shapes using a paper trimmer, then add your edge details with a craft knife.
- Green Pearls: Adds a touch of elegance and colour to your card. Alternative: Use small embellishments like rhinestones or sequins for a similar effect.
- Alcohol Markers: or vibrant and smooth colouring of your digital stamp. Alternative: Colored pencils or watercolour markers can be used if alcohol markers aren’t available.
- Distress Inks (Antique Linen and Vintage Photo): This creates coffee-stained effects and adds depth to your background. Alternative: Any brown or beige ink can achieve a similar look.
- White Gel Pen: Ideal for highlighting and adding small details. Alternative: Use a white coloured pencil or paint for highlights.
- Brown Card Stock: Serves as a rich base for your patterned papers. Alternative: Any colour or patterned paper can be used as a base if brown card stock isn’t available.
- White Card Base: The foundation for your card, provides a clean and crisp backdrop. Alternative: Use any light-coloured card stock.
- Foam Tape: Adds dimension by lifting elements off the card base. Alternative: Use foam squares or double-sided tape for a similar effect.
- Glue: or attaching various elements Alternative: Any strong adhesive or glue stick can be used.
- Paper Trimmer: Ensures clean and precise cuts for all your paper pieces. Alternative: Use scissors if you don’t have a paper trimmer.
Have you used Polkadoodles products? Share your favourite stamps or papers in the comments.
Crafting Your Coffee-Themed Card Step-by-Step
In this section, you’ll find a clear and straightforward guide to creating your coffee-themed card. We’ll walk through each step, from preparing your materials to assembling your finished design, ensuring that you achieve a card with charm and an encouraging message. Let’s get started on bringing your creative vision to life.
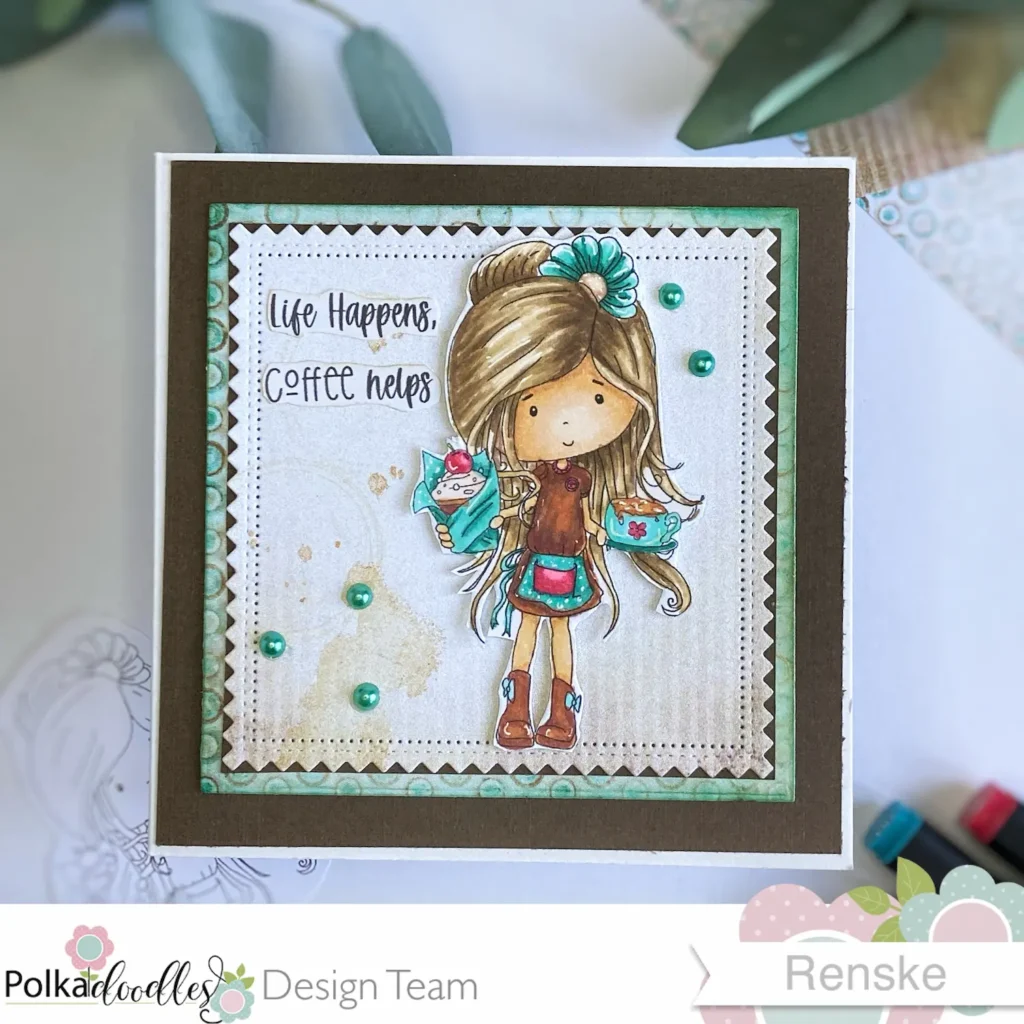
Step 1 Print and Prepare the Digital Stamp
I chose the Barista Coffee/Cake Digi Stamp for this card because its coffee theme matches the encouraging message.
Start by printing your digital stamp on DCP paper, which is ideal for using alcohol markers. This type of paper prevents bleeding and ensures vibrant colours.

Step 2 Colouring the Stamp
Use alcohol markers to bring your digital stamp to life. I used the following colour combinations:
- Skin: Use Tanned Skin, Peachy Blush, Salmon Pink, and Pale Cream for a natural look.
- Hair: Blend Pale Cream, Brown Grey, Walnut, and Clay for depth and dimension.
- Dress and Shoes: Combine Rose Beige, Burnt Sienna, and Natural Oak for a warm, cohesive look.
- Apron, Cupcake Wrapper, Mug, and Flower: Apply Teal Green, Neo Mint, and Aqua Mint for a fresh, coordinated appearance.
- Cherry, Flower on Mug, and Apron Pocket: Use Rose Pink, Cherry Pink, and Vivid Red for vibrant details.
- Cupcake: Colour with Natural Oak for a realistic finish.
- Frosting: Blend Pale Cream and Chai Latte for a smooth, creamy effect.
- Coffee: Use Rose Beige and Sand for a warm coffee tone.
Use a white gel pen to add highlights and small details. Apply dots on the apron and cupcake wrapper. Add highlights to the flower, mug, coffee, and shoes.
Carefully cut around the image, leaving a white border. This border helps with details like hair and edges that can be tricky to cut precisely.

These techniques enhance the image and add dimension.
Step 3. Creating the Background with Patterned Papers from Polkadoodles
Transforming the background of your card is an important step to let the patterned papers stand out. For a coffee-themed card, I chose two patterns from the Polkadoodles Paper Heaven 1 set, each adding a touch to the final design.
Select and Cut Your Patterned Papers
- Paper Heaven 1 – Horace Boo:: Choose a teal green paper adorned with circles and bordered with brown and mint green. This vibrant pattern sets the stage with a lively yet sophisticated look.
- Beige Patterned Paper: Choose beige paper with light brown stripes, which is perfect for enhancing the coffee theme.
Prepare the Beige Paper
- Die Cutting: Use a square die with triangular edges to cut the beige patterned paper, creating a stylish, geometric border.
- Adding Coffee Stains: Before adhering to your card, distress the beige paper to mimic coffee stains. Apply Distress Ink in Antique Linen and Vintage Photos.
- Stamp coffee ring images with Antique Linen on the left side of the panel.
- Use a clear stain stamp, applying antique linen in the centre and vintage photos along the edges for a rich, textured coffee stain effect.
- Finish with a small splatter stamp in Vintage Photo for a realistic coffee spill look.
- Layering: Adhere this distressed paper to a piece of dark brown cardstock. Position the paper so the dark brown shows through the triangular openings, creating a framed effect.
")

Prepare the teal-green paper


- Die-cutting: Use a square die to cut a square from this paper pattern. If you don’t have a die, you can also use a paper trimmer. The size of this square is 10.8 centimetres by 10.8 centimetres.
- Blending: Apply Peacock Feathers and Vintage Photo Distress Inks to the edges of the teal green paper using a blending brush. This adds depth and highlights the rich patterns in the paper, complementing the coffee theme.
By combining these patterned papers and distress techniques, you’ll create a visually appealing background that enhances the overall coffee theme of your card.
Step 4: Crafting the Card Base and First Layer
Creating a strong foundation for your card is an important step that sets the stage for your creative design. Here’s how to make a sturdy and stylish base for your coffee-themed card.
Create the Card Base
- Cut and Score: Begin with a piece of white cardstock measuring 26 cm by 13 cm. Score the cardstock at 13 cm to make a square card base measuring 13 cm by 13 cm when folded.
- Fold and Crease: Fold the scored cardstock in half along the 13 cm line and crease the fold firmly to create a neat and professional-looking card base.
Add the First Layer
- Cut the Dark Brown Paper: Trim a piece of dark brown cardstock to 12.5 cm by 12.5 cm. This will be the first layer on top of your card base.
- Adhere the Layer: Trim a piece of dark brown cardstock to 12.5 cm by 12.5 cm. This will be the first layer on top of your card base.
The dark brown layer provides a rich backdrop that complements the other elements of your card, offering a perfect base for the patterned papers and decorative details you’ll add next.
Step 5: Adding the Perfect Sentiment
Incorporate the right sentiment into your card to add a personal touch and tie the design together. For this coffee-themed card, the sentiment should complement the playful and comforting vibe of the design.
Choose Your Sentiment
Select the text from the Coffee and Cake sentiment set, and choose the phrase “Life happens, coffee helps.” This sentiment aligns perfectly with the coffee theme and adds a touch of warmth to your card.
Print and Prepare
- Print the Sentiment: Print out the sentiment using your preferred printing method. Ensure the text is clear and well-positioned for easy cutting.
- Separate the Phrases: Carefully cut the printed sentiment into two parts: “Life happens” and “Coffee helps.” This separation allows for a flexible arrangement on your card and can enhance the visual appeal.
The sentiment “Life happens, coffee helps” not only ties in beautifully with the coffee stains on the patterned paper but also adds a meaningful message to your card. Placing these phrases thoughtfully will enhance the overall design and make your card even more special.
Step 6: Assembling the Card and Adding the Finishing Touches
Putting your card together and adding those final details is where your creation truly comes to life. Here’s how to assemble your coffee-themed card and add those special touches that will make it shine.
Layer the Patterned Paper
Use foam tape to attach the patterned paper layers to the card base, ensuring they are centred and aligned. The foam tape will create dimension and a striking effect.
Add the Digital Stamp
Apply foam tape to the back of your coloured digital stamp and place it on the patterned paper panel, ensuring it is centred. The foam tape will give your image a nice lift and add depth to your card.
Place the Sentiment
Attach the cut sentiment pieces, “Life happens” and “Coffee helps,” in the top left corner of your card, slightly staggering them for a dynamic look.
Add Embellishments
For the final touch, place mint green pearls on your card. Position three pearls in the bottom left corner and two in the top right corner to add elegance and polish to your card.

Assembling your card is the moment when all the pieces come together to create a beautiful finished product. With each layer and detail, you’re adding your unique touch and making your coffee-themed card truly special. Enjoy the process and the satisfaction of seeing your design complete!
Why Coffee-Themed Encouragement Cards Work
A Coffee-themed card is more than just a charming choice; they carry a sense of warmth and comfort that makes it perfect for encouragement. Let’s explore why this cosy theme resonates and how it can brighten someone’s day.
Coffee symbolizes warmth, comfort, and relaxation. It’s not just about the drink but the comforting moments associated with it. Whether it’s the feeling of a warm cup in your hands or the cosy atmosphere of a café, these elements create a perfect backdrop for an uplifting message. A coffee-themed card taps into these feelings, making it an ideal way to offer encouragement and support.
Sending a handmade card, especially with a coffee theme, shows a personal touch that can significantly lift someone’s spirits. It’s like sending a warm hug in the mail. The effort you put into creating a card that reflects their interests, even something as simple as coffee, can make a big difference.
Have you received an encouragement card that brightened your day? Share your story in the comments and how a simple message made an impact.
Although I’m more of a tea drinker myself, I can see how a coffee-themed card can be a delightful way to connect with friends who love coffee. For instance, this card might be the perfect excuse to invite a coffee-loving friend out for a chat a cup of coffee for her, and tea for me.
These personal touches make such cards even more special
Coffee-themed encouragement cards work because they offer comfort and thoughtfulness, making them a meaningful way to show you care.
Let’s Get Creative Together
We’ve gone through the process of creating a charming coffee-themed card for encouragement, from printing and colouring the digital stamp to assembling the final layers with mint green pearls.
Each step has brought us closer to crafting a card that’s not only visually appealing but also filled with warmth and thoughtfulness. I hope this process inspires you to embrace the charm of coffee-themed cards and explore your creative ideas.
More Drink and Food Inspiration Cards
Looking for more ways to infuse your card-making with delightful drink and food themes? Check out these related blog posts for more creative ideas and inspiration:

Flip! It’s your birthday card| Polkadoodles
This handmade card has a similar design, only now with an interactive section
Explore these posts for more tasty and whimsical card designs to inspire your next project!
Polkadoodles products in the Spotlight
Affiliate Disclosure: Please note that some of the links in this article are affiliate links. This means that I may earn a small commission if you purchase through these links, at no additional cost to you. I only recommend products or services that I use and believe will add value to my readers. Your support helps keep this blog running and allows me to continue creating valuable content for you. Thank you for your support!
Barista Coffee/Cake digi stamp

Paper Heaven 1 – Horace and Boo digital paper set

Pretty Printable paper 1 – Helga Hippo

Coffee, tea, and cake digital greetings and quotes

I would like to enter my card in the following challenges:
- A Place To Start: Anything goes
- Cardz 4 Galz: Any colouring medium
- Classic Design Challenge Blog: Anything goes
- SheepSki Designs Challenges: Anything goes
- Lil Patch of Crafty Friends Challenge …: Anything goes
Great card and sentiment. Nice work. Thank you for sharing with us over here at Sheepski Designs and best of luck with your entry.
Annette DT for https://sheepski-designs-challenges.blogspot.com/
Thank you so much Annette.
Gorgeous hair colouring, a very pretty card. Thanks for sharing with us at Cardz 4 Galz. Caz. DT.
Thank you so much.
Another awesome project! Thanks for sharing this with us at A Place to Start!
Hugz,
Chana
Fun card! My daughter would LOVE it!
Thanks for playing along at Cardz 4 Galz!