

Hello, fellow crafters!
Welcome to another exciting blog post where we dive into the wonderful world of card making.
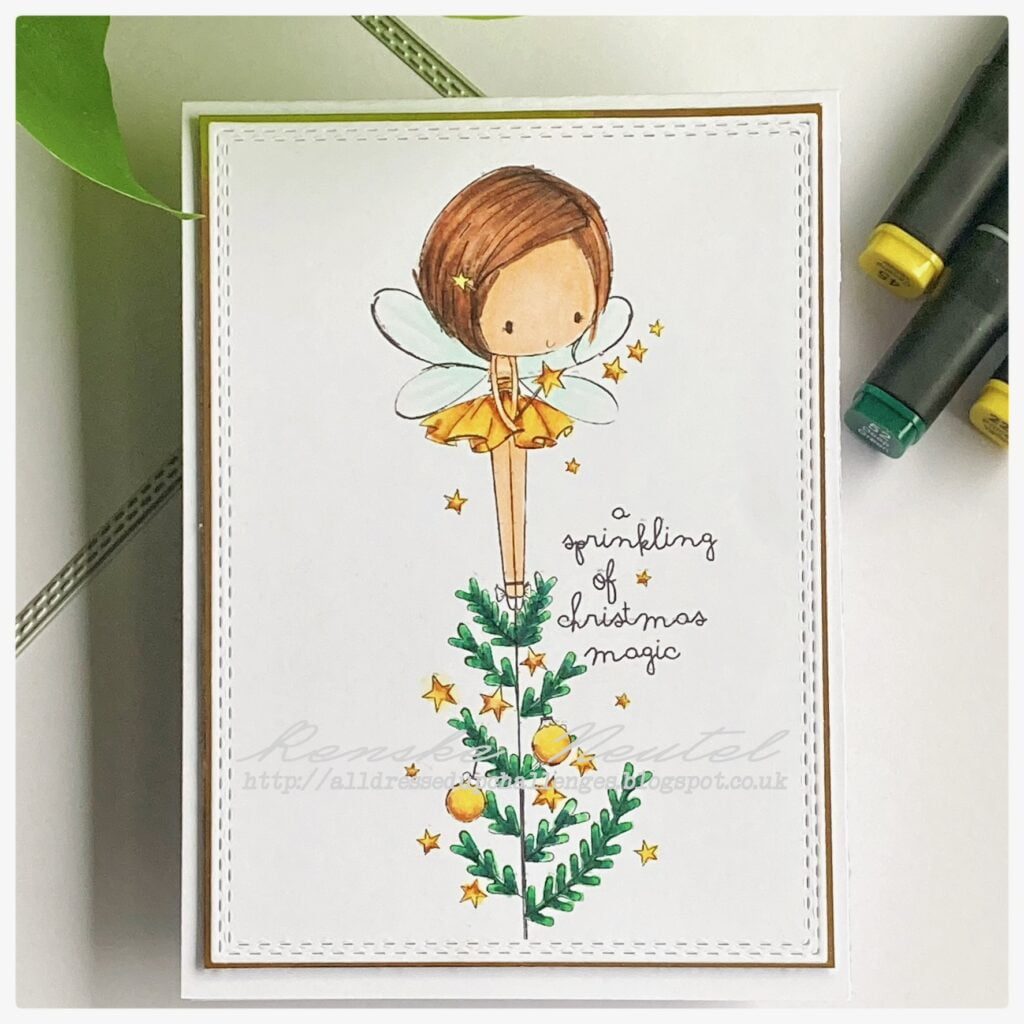
With the holiday season fast approaching, I couldn’t resist spreading some festive cheer in advance. What better way to do that than by guiding you through the process of making your own “Christmas Baubles Card”? This card is a perfect representation of the holiday season, complete with a charming elf, glittering details, and all the magic of Christmas.
But wait, there’s more! This card is not just about crafting; it is also designed to take part in the All Dressed Up challenge. This lively Facebook community provides an excellent opportunity to showcase your creativity and win exciting prizes. I will tell you all about the theme, the fantastic All Dressed Up community, and how you can take part. Plus, I have something special to highlight – a beautiful digital stamp that is central to this project. You can get this stamp through my affiliate link.
So, grab your crafting supplies, get comfortable, and let’s start this creative journey together. We are about to create a Christmas card that will shine and sparkle, just like the holiday spirit itself. Let’s get started!
About the All Dressed Up Challenge
Let’s talk about the exciting challenge that inspired this crafting adventure before we dive into the creative details. It’s the All Dressed Up challenge! This challenge takes place every month within their active Facebook group and is open to crafters from all over the world.
To participate, you need to create your own project that fits the “Gems, Sparkle, and Shine” theme. You can use various elements to add sparkle, including rhinestones, sequins, glitter or any other materials. You must use an All Dressed Up digital stamp. This can be any stamp you like, but you can also use our star of the show Christmas Baubles. Your entries must be hand or digitally coloured, and you can submit up to three entries.
The challenge runs throughout November, so you have plenty of time to create and share your masterpiece with the community. However, I suggest you do not wait until the last minute! Crafting is about enjoying the process and taking extra time can lead to beautiful results. Additionally, you might inspire others in the process.
So, are you up for the challenge? I can’t wait to see your sparkling creations. Join me as we explore how to craft a card that perfectly fits this theme.
Meet the Digital Stamp: Christmas Baubles
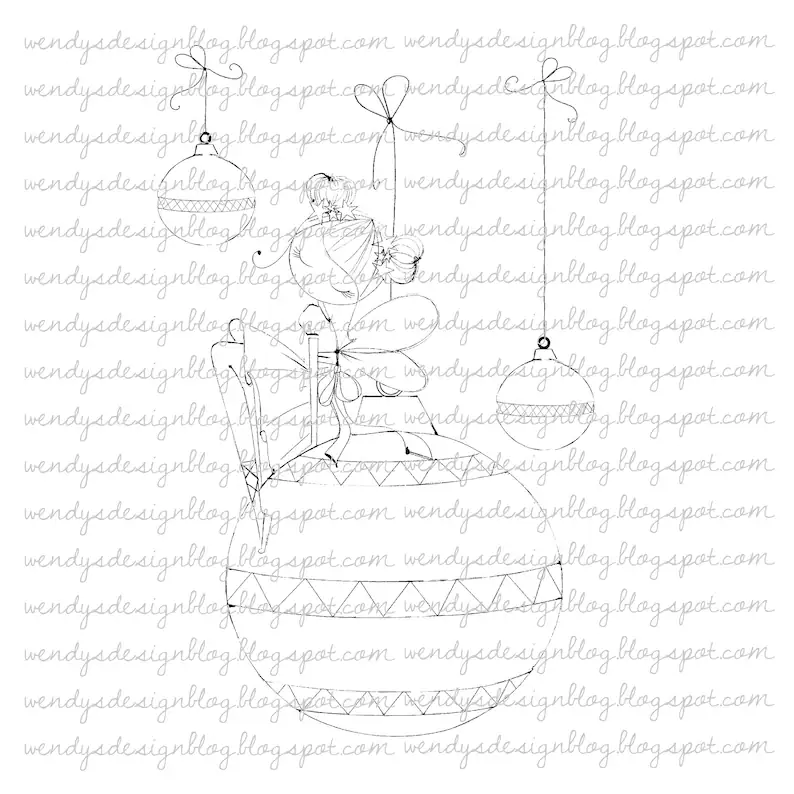
Let’s take a moment to introduce the star of our creative show – the “Christmas Baubles” digital stamp from All Dressed Up Stamps. This design perfectly embodies the festive spirit with its intricate details and charming elf and delicate baubles. It’s a great choice for our “Gems, Sparkle, and Shine” challenge, and it inspires creativity and radiates the spirit of Christmas.

I chose this stamp because it encapsulates the essence of the holiday season – joy, wonder, and enchantment. It provides ample opportunities for colouring and adding personal touches, making it a lot of fun to work with.
If you want to get your hands on this digital stamp, you can use my affiliate link here to purchase it. Not only will you get a beautiful stamp to work with, but you will also be supporting this blog in the process. It’s a win-win!
So, let’s get ready to create a Christmas card that sparkles and shines with our magical digital stamp. Trust me, it’s going to be a lot of fun!
Materials and Tools
To ensure that you are well-prepared to create your “Christmas Baubles Card,” I have prepared a comprehensive list of all the materials and tools you’ll need, along with links (where possible) to where you can find them.
Materials
- “Christmas Baubles” Digital Stamp: The heart of our project. You can find this delightful digital stamp right here.
- White card stock: Choose sturdy cardstock in your preferred colour for the card base. You can explore a variety of options at your local craft store or online.
- Ink Pads: To add depth and colour to your project, you’ll need ink pads. I used the Chalk ink from Decotimecrafts.
- Metallic Paint: For those elegant metallic accents, have some metallic paint on hand. You can find various metallic paint brands at most craft stores.
- Twin Markers (Alcohol Markers): Perfect for colouring your digital stamp. I used Twin Markers from Decotimecrafts. But you can use any colouring medium you like
- Embossing Powder: If you want to add sophistication to your sentiment, grab some embossing powder. I chose the dazzling Golden Wow embossing powder for that extra shimmer.
- Clear Embossing Ink: For use with the embossing powder, you’ll need clear embossing ink. I used Nuvo clear embossing ink.
- Glitter 3D Drops: For that extra touch of sparkle, you’ll want glitter 3D drops. I used a gorgeous gold.
- Gold shiny paper: To add a touch of elegance with layers and embellishments, consider golden paper.
- Clear Stamp for “Merry Christmas”: Look for a clear stamp featuring your favourite holiday sentiment. I used an old clear stamp out of my stash.
- White card stock: You’ll need white card stock for creating die-cut embellishments. You can find a variety of options at local craft stores or online
Tools
- Printer: To print your digital stamp on cardstock.
- Scissors: For precise fussy cutting of your coloured digital stamp.
- Ink Blending Brushes: To create smooth ink blends.
- Heat Gun: Essential for embossing the sentiment.
- Die Cutting Machine: A must-have for crafting die-cut embellishments.
- Adhesives: Choose between double-sided tape, foam tape, or glue for assembling your card.
With this list of materials and tools, you’re all set to embark on your creative adventure. Whether you’re an experienced crafter or just starting, I’m here to guide you through the process. Now, let’s dive into the joyful world of crafting!
Step-by-Step Tutorial for this Christmas Baubles card
Now it’s time for the real thing – making your own Christmas baubles card. Don’t worry; I’m right behind you with a step-by-step guide that will make this project a piece of cake. We’ll walk through the process together to make your card as charming as possible.
Step 1: Printing the Digital Stamp
Start by printing the “Christmas Baubles” digital stamp on quality cardstock. I use DCP paper for this, as this also works well for colouring with alcohol markers. Make sure your printer settings are configured for the best print quality. The high-resolution image captures all the intricate details.
Step 2: Coloring the Digital Stamp
Let’s bring our card to life by adding colours to the “Christmas Baubles” digital stamp using your Twin Markers (Alcohol Markers) or any colouring medium of your choice. This is where your creativity can truly shine.
Colour Combinations
Here are the specific colour combinations I used for this project:
- Skin: Tanned Skin (260), Peachy Blush (259), Salmon Pink (25), and Barely Beige.
- Hair: Leather (113), Brown Grey (104), Walnut (100), and Clay (116).
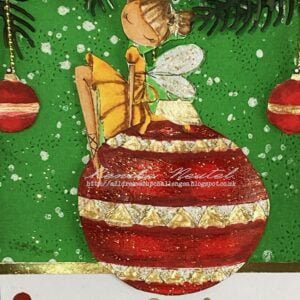
- Baubles: Cardinal (244), English Red (249), and Burgundy (247).
To meet the challenge, I added shiny elements to the baubles. You can see a pattern with three corners on the baubles. I used gold pearl glue and gold glitter 3D drops to colour these corners. I coloured the three corners at the bottom of the border with pearl glue and the three corners at the top of the border with glitter 3D drops.
Step 3: Creating the Background
Let’s walk through the process of creating the enchanting background for your “Christmas Baubles Card”.
Select Your Panel
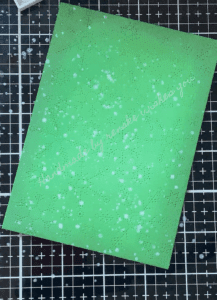
Begin with a high-quality cardstock panel measuring 9.5 cm by 14 cm. For this card, I recommend choosing a beautiful shade of green that is perfect for the holiday season.
Ink Blending
I used chalk ink to create a stunning gradient background. Start by applying black ink around the edges, gradually transitioning to lighter shades of green as you move towards the centre. For this background, I used Ripe Olive, Green Beans, The Hulk, and even Black Tulip for extra depth. The result is a background that exudes depth and richness.
Edding a pattern to the background
To add a touch of elegance, I used a background die with a festive pattern. In this case, one that imitates ice flowers. Run the inked panel through your die-cutting machine to create this pattern for your background.
Glistening Touch
To enhance the holiday feel, add some subtle glistening to your card. Use white metallic paint to create delicate splatters across the background.

With your background complete, your “Christmas Baubles Card” will start shining. This beautiful backdrop will perfectly complement the coloured digital stamp and other elements of your card.
Adhering the background to the card base
Now that the back panel is ready, it can be attached to the base card. However, before we do that, we need to create a shiny gold border around the background panel. To accomplish this, we should use gold paper with a size of 10 centimetres by 14.5 centimetres. Stick the background panel on top of this paper, and voila, we now have a nice shiny gold border around our background panel!
Now we can paste this border panel onto our base card. I used a base card that measures 10.5 centimetres by 14.8 centimetres. You can either use a pre-made base card or make one yourself. I made the fold at the top of the card. To make the fold, you need a piece of white paper with a size of 10.5 centimetres by 29.6 centimetres. Score at 14.8 centimetres to make the fold.
Step 4: Preparing Die-Cut Embellishments
To add texture and dimension to your card, you can create embellishments using coloured or white cardstock with a die-cutting machine. You can die-cut it with the right colours out of card stock, or cut it from white cardstock and colour it with alcohol markers. I prefer the latter because it matches well with the coloured digital stamp. For my card, I created the following elements: holly leaves, berries, and pine branches.
I coloured these parts with my alcohol markers. I used the following colour combinations:
- Pine branches: Pine Forest
- Hulst: Forest Green (50), Grass (47), Weeds Green (162)
- Besjes: Cardinal (244), English Red (247), Burgundy (247)
Step 5: Adding the Sentiment
To add a heartfelt message to your card, start by using transparent embossing ink to stamp your chosen ‘Merry Christmas’ sentiment on a piece of white card stock. I recommend using white card stock that measures 2.5 centimetres by 9.5 centimetres for this purpose. Once you have stamped the sentiment, sprinkle the embossing powder generously over it. Use a heat gun to melt the powder, which will create a beautiful embossed effect.
To complete this step, take the strip of white paper with the sentiment and stick it onto a strip of gold paper. I suggest using gold paper that measures 3 centimetres by 9.5 centimetres. This will give your card a festive and elegant touch.
[Image: Insert image of embossing the sentiment]
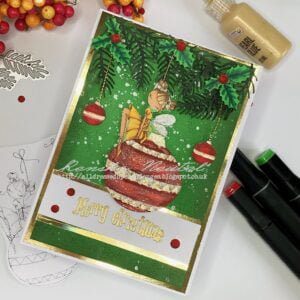
Step 6: Assembling the Card: Christmas Baubles
Congratulations! We’ve reached the final piece of your “Christmas Baubles Card”. Here’s how to put the card together and ensure that every element shines.
Plan the placement of the sentiment
Before you begin assembling the card, take some time to plan the placement of the sentiment. It should be a prominent and heartwarming part of the card, but not obstructed by other elements. Place it down enough so that you can put everything in the right place.
Attaching the branches of the pine tree
Start by attaching the pine branches to the top of the background. These branches create the feel of a Christmas tree in which the baubles hang. Make sure you attach them firmly to the background for more stability.
Adding the baubles
Now let’s start attaching the digital stamp. Carefully attach the large central bauble with the enchanted elf to the identified spot on your background. Use foam tape for a subtle raised effect, adding depth to your card. For an extra touch of authenticity, remove the drawn string from the digital stamp and replace it with a gold thread. This is not only visually appealing, but it also creates a dynamic effect.
Next, place the two smaller baubles on either side of the central bauble. These should hang elegantly and reflect the larger one. Secure them with foam tape The golden threads also play an important role here. They provide that whimsical touch that makes the card truly magical.
Embracing the Holly Details
Now that the baubles are in place, add the delicate holly leaves and berries to your design. These elements add a natural, seasonal touch to your card. Attach the holly leaves and berries to the ends of the golden threads coming out of the baubles. This creates a harmonious composition and ensures that each element is connected.
And there you have it – your “Christmas Baubles Card” is now fully assembled and ready to spread holiday cheer. Careful planning of the placement of the sentiment, the placement of the baubles and the addition of the holly details make for a balanced, captivating design.
Now it’s time to enjoy the joy of sharing your creation with friends and loved ones.
Related Posts and Ideas
It was a pleasure creating this “Christmas Baubles Card”. If you’re looking for more card-making ideas or related projects, we have some suggestions:
Get inspired with these related posts and ideas for endless holiday crafting. Keep the creativity flowing with handmade cards and projects.
Affiliate Products Used:
Christmas Baubles from All Dressed Up Stamps
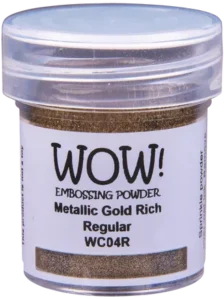
Wow Metallic Gold Rich Regular
Nuvo Clear Mark Embossing Pad
I would like to enter my card in the following challenges
- Try it on Tuesday: Sparkle all the way
- The Sisterhood of Crafters: Get Inky
- Scrapping4funChallenges: Traditional Christmas Colours
- Allsorts challenge blog: Embossing Heat or Dry.
- A Perfect Time To Craft Open Challenge: Anything goes
- Classic Design Challenge Blog: Anything goes
- Crafts Galore Encore Challenge Blog: Anything goes
- Pearly Sparkles Challenge Blog: Christmas/Winter
Stunning card, Thank you for Joining us at Scrapping4funChallenge and waiting to see you next time. Happy Crafting
Hugs
DT Meenaa Herale
https://cardscraftandart.blogspot.com
Thank you
Cute card,great colouring with lovelyfestive colour tones. Thanks for joining us at the Pearly Sparkles challenge this month Claire DT
Thank you so much ❤️
Such a fab tutorial too!
Such a great project!
We do love to see all the entries at Classic.
Thank you for sharing in our challenge at Classic Design Challenge so
We really appreciate you joining in.
Jackie DT
Thank you so much for your lovely comment ❤️
Lovely Christmas card!
Thank you for your entry at Scrapping”four”funChallenges.
I have trouble to comment on your post, because of the letter in my name.
Hugs Rachelle
https://scrapping4funchallenges.blogspot.com
Hi Rachelle, thank you for your lovely comment. Thanks for mentioning that. What is the issue exactly? Maybe I can solve that. Hugs Renske
Such a beautiful design! The little fairy is so adorable atop the bauble and I love all the sparkle from the glitter and gold 😊. Thanks so much for joining in the fun at Try it on Tuesday. Happy November ❤️. Hugs, Jo x
Thank you so much for your lovely comment ❤️
Fantastic details and design on this festive card. Thank you for joining us at the Crafts Galore Encore Challenge.
Lorraine
Thank you
Renske your card and glorious image is stunning, one of my fave Wendy Burns images which you have done perfectly xx
also thanks for entering into our Sisterhood of Crafters challenge xx
Ah thank you so much for your lovely comment ❤️
Lovely card! Thanks you for sharing with us at TIOT!
Thank you
Fabulous card!
Thank you for sharing at Allsorts.
DT Mervi
Thank you
WOW This is just GORGEOUS! Love that background and the dimension you’ve achieved is awesome! BEAUTIFULLY designed! Thanks so much for joining in the fun at our Sisterhood of Crafters challenge! Good Luck and we hope you’ll come back often.
Darlene
DAR’S CRAFTY CREATIONS
Owner
Sisterhood of Crafters
Co-Owner … Can You Handle the Pressure, Double D, Four Seasons, Peace On Earth, Stencil Fun, Simply Clean & Simple, Two Old Bats, Triple B
Thank you so much for your lovely comment
A beautiful card, I love the sweet image. Thank you for joining in the Allsorts Challenge this week.
Liz xx
Thank you
A delightful card in the traditional Christmas colours, many thanks for joining us at Allsorts challenge this week.
B x
Thank you so much