

Hello everyone!
I’m excited to guide you through creating a Bunny Christmas Card, a fun and personal way to send holiday greetings. Whether you’re a seasoned pro or just starting, this step-by-step guide promises an enjoyable and rewarding crafting experience.
Join me on this festive journey as we add the charm of singing bunnies to our cards. I can’t contain my excitement for this project – it’s a perfect blend of cuteness, festivity, and a sprinkle of sparkle.
Are you ready to bring holiday cheer to your crafting space? Grab your tools, unleash your creativity, and let’s craft a Bunny Christmas Card that spreads joy. Share your thoughts in the comments below – I’d love to hear what makes holiday crafting special to you. Let’s dive in together!
Materials Needed for this Bunny Christmas Card:
Before we start making our Bunny Christmas Card, let’s make sure we have all the materials ready. Here is what you will need:
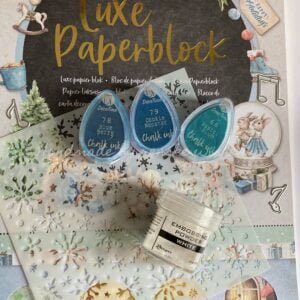
- Decotimecrafts Luxe Paper Block or any other Paperblock you want to use: This paperblock has many different bunny illustrations and festive elements you can use to create unique and captivating cards.
- Aqua Nuvo Shimmer Pen: Give your card a touch of magic with this glitter pen. Bring your bunnies, lights and trees to life and add a touch of glitter for a festive look. Of course, you can also use a regular glitter pen.
- Lamp posts (optional): This is an element I found to add to the card. If you don’t have this you can of course omit it, or add another element to the card.
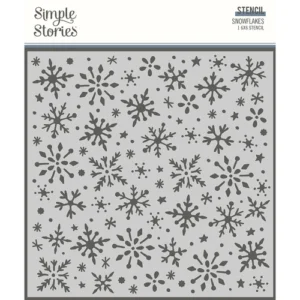
- Winter Stencil (Optional): A winter stencil is perfect for creating a snowy background and adding snowy details to enhance the charm of your card. This can be any winter stencil you like. But you can also use pattern paper for the background.
- Chalk Ink in Various Shades: For this card I used chalk ink in the Blind Berry, Cookie Monster, and Oh My Love to breathe life into your card’s background. But you can use any inks and colours you like.
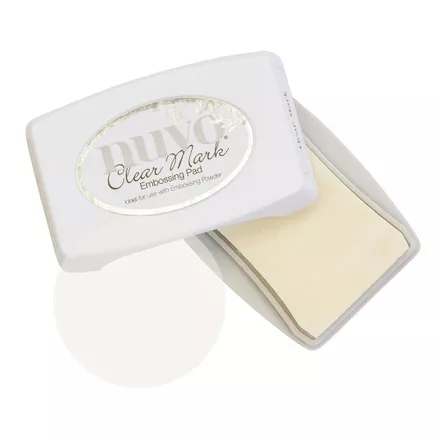
- Clear Mark Embossing Ink: This clear embossing ink is essential for creating a stunning embossed effect. Use it with a winter stencil for an elegant touch.
- White Embossing Powder: To give your card a snowy and frosty look, use white embossing powder. It turns your inked snowflakes into a winter wonderland.
- Heat Gun: A reliable heat gun is essential for setting the embossing powder and bringing your snowy scene to life.
- Foam Tape: Use foam tape to add dimension to your card. It can make your bunnies and elements pop off the card, creating a captivating 3D effect.
- Musical Notes dies(optional).
- Black Cardstock (for Musical Notes): Use black cardstock to create nuts for a final touch of sophistication.
Now that we have everything we need, let’s start making our Bunny Christmas Card. Are you excited? I know I am!
Step-by-Step Tutorial
Are you ready to unleash your creativity? Great! Let’s take it step by step and create something truly special.
Step 1: Finding the Perfect Image
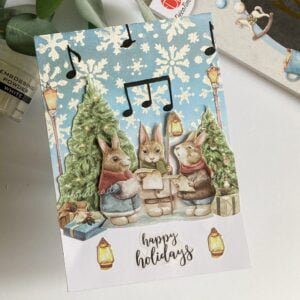
To start our creative journey, we need to choose the star of the show – the image of our singing bunnies. Take a look at the Decotimecrafts Luxe Paper Block or any other paper block and choose the perfect illustration to suit your party spirit. Choose one that will make you smile, as it will surely bring joy to your recipient.
Also choose the images you want to use to complete your scene on the card. In my case, that is, the Christmas trees, the lampposts, the lights, presents and the text.
Now that we have picked our images for the card , we can get to work.
Step 2: Adding Shimmer Accents
In this step, we add shimmering accents to different parts of our card to make it more magical. For this, we will need an Aqua Shimmer Pen or any other glitter pen you have. Carefully apply glitter accents to the lights, the bunnies’ feet and scarves and any other details you want to highlight. In this step, the ordinary turns into the extraordinary, adding that touch of glitter that makes our card truly enchanting.
Step 3: Using Lighthouse Elements
In another diy paperblock, I found two lampposts. And that was just another element I was missing. This is just the extra detail that gives the card that extra something. If you don’t have lampposts, look for another element that could fit well into the scene. . Don’t underestimate the power of these subtle details to improve the final result.
Step 4: Creating the Background
Time to set the stage for our festive bunnies.
The background plays an essential role in setting the tone for the story of our card. To create the background, you will need a panel measuring 10.5 x 14.8 centimetres, which we will divide into two parts. The top half will be a beautiful blue sky, while the bottom half will be white to resemble snowy ground.
To create the blue sky, you will need inks in three shades. I used my chalk inks from Decotimecrafts. I used the following colours:
- Blind Berry
- Cookie Monster
- Oh My Love.
Start by applying the darkest shade at the top and gradually work your way down with lighter shades to create a gradient effect. Stop just beyond the middle of the panel to achieve the desired gradient.
Now, to add some texture, use a winter stencil and Nuvo Clear Mark Embossing Ink. Apply the ink over the snowflakes on the stencil and then sprinkle white embossing powder over it. Use a heat gun to apply heat on the powder, and watch the snowflakes come to life with a burst of winter charm.
Step 5: Final Touches with Musical Notes
To emphasise that the bunnies are singing, I placed black musical notes in the background.
To make a pair of black musical notes, you will need black cardboard or paper and musical note punches. Die-cut a few musical notes and give them a touch of glitter and shine with your Aqua glitter pen.
Step 6: Assembling Your Card
Now let’s bring all the elements together and bring the scene on the map to life. Start with the base of our winter wonderland by placing the lampposts and trees. Attach the charming lampposts to the lamp posts and place them where you want them. I place the lantern poles on the sides of the card and the Christmas trees slightly to the right of that. This way, the lampposts come out nicely behind the Christmas trees. This helps to create the cosy Christmas atmosphere we like.
The star of our card, the image of our singing bunnies, deserves a central stage. Use foam tape to affix this illustration, ensuring it stands out with a delightful 3D effect. This not only adds visual interest but also brings our festive bunnies to life.
We place the musical notes over the ice star background. This makes the musical notes appear to fly up from the bunnies’ mouths. This emphasises the scene a little more that the bunnies are singing.
As we build our winter scene, let’s place tiny, meticulously wrapped gifts around the base of the trees to fill any perceived emptiness. This not only fills any visual gaps but also adds an extra layer of delight to our festive tableau.
At the bottom, place the text “Happy Holidays” to capture the essence of the season. This sentiment forms the heart of our creation and radiates festive cheer to all who see it. Place mini lanterns on either side of the text to draw a little more attention to it.
By placing the elements on the card, our scene came to life. Everything helps tell the story of these bunnies.
Inspire, Create, Share, and More!
Thank you for joining me on this creative journey as we crafted this heartwarming “Bunny Christmas Card”. I hope you have joined the process and feel inspired to create your unique handmade card.
If you have any questions, need clarifications, or want to share your thoughts, I’d love to hear from you. Crafting is not just a hobby; it’s a wonderful community and I’m here to support you in your creative endeavours.
More Card Making Ideas
Create Your Own Magic: Easy DIY Holiday Cards and Universal Crafting Techniques
I also made this card with a luxury paperblock from Decotimecrafts. This time I used glossy highlights.
DIY Christmas Card: Quick and Easy Handmade Holiday Greetings
This card was also made with one of Decotimecrafts’ new luxury paperblocks.
This card is made last year with a luxe paperblock from Decotimecrafts. I hope it inspires you what you can do with this kind of paperblocks.
Products Used with Affiliate Links

Products used without affiliate links
- Luxe Paperblock Decotimecrafts. You can buy this in the ActionNL stores.
- Chalk Inks Decotimecrafts. You can buy this in the ActionNL stores.
- Foam Tape (brand unknown).
I would like to enter my card in the following challenges:
- Unicorn Challenge Blog: Christmas
- Through The Purple Haze Challenges: Anything goes
- Krafty Chicks Challenge: Christmas Week
- Lil Patch of Crafty Friends Challenge …: Anything goes
- 613 Avenue Create: Anything goes + embossing
- A Perfect Time To Craft Open Challenge: Anything goes
- Crafts Galore Encore Challenge Blog: Anything goes
- Creative Moments: Winter
- Daisy Chain Challenges: Christmas/Winter
- Pearly Sparkles Challenge Blog: Christmas/Winter
- Critter Crazy CHALLENGE BLOG: Anything goes + Featured critter
- Crafty Animals: Anything goes + must use an animal
- Most Magical Time of the Year!: Anything Christmas and Halloween Goes
- The 12 Months of Christmas Link Up: Anything goes + Cosy Christmas
So cute – love the scene you’ve created.
Thanks for joining us at The Creative Moments Challenge
Helen x
DT
Thank you
Super cute card, thank you for the “how to” steps, great to read. Thank you for joining us at the Crafts Galore Encore 117 Challenge.
Thank you for your lovely comment ❤️
Super cute card Renske, the bunnies are adorable . Thanks for joining us at the Pearly Sparkles Challenge this month Claire DT
Thank you
So sweet, Renske. Thanks for joining us at 613 Avenue Create. I hope we see you on the front porch again soon!
Hugs, Em
613 Avenue Create DT
Creative Em my blog
Creative Em on YouTube my Youtube channel
Thank you
Wat een gezellig, warm kaartje!❤️
Dank je wel