

Hi there! I’m excited to share how I made a bright tropical birthday card for the Hobbyshoponline challenge. We’ll be using alcohol markers, ink blending, stamping, and water splatters to create playful texture and vibrant colour.
If you want to make a one-of-a-kind birthday card or explore a fun pineapple theme, I’ll guide you through each step. I’ve included tips for all skill levels, so you can create a card that truly feels like yours. By the end, you’ll have a tropical card ready to delight someone special.
Gather your favourite markers, stamps, and cardstock, and let’s make a tropical birthday card together that will bring a little sunshine to someone’s day.
Materials You’ll Need for Your Tropical Birthday Card
Before you begin, gather your supplies. The list below outlines the materials, their purpose, and practical alternatives, so you can confidently create with what you already have
Foundation Materials
- White card base (10.5 × 14.8 cm): This will serve as the foundation of your card. You can use any smooth cardstock or even watercolour paper for a different texture.
- Black cardstock (Via Chasse): This is used to layer the background and make the tropical colours pop. Any dark cardstock can be used as a substitute.
Coloring Tools:
- Clear stamp set – Take me to the ocean, Tropical Summer (StudiolightNL): This set features a pineapple with leaves and flowers, which will be the focal image of our card. You can also choose another tropical stamp or a digital print if you prefer.
- Alcohol markers (Twinmarkers / Decotimecrafts): These markers will be used to colour the pineapple, leaves, and flowers. You can substitute with other alcohol markers, water-based markers, or colored pencils if needed.
- Distress inks – Mustard Seed & Picked Raspberry: These will be used to create the tropical background. You can also use other distress or dye inks to achieve a similar gradient effect.
Finishing Touches
- White gel pen: This adds highlights and small details to make your image pop. Any white gel or paint pen will work as a substitute.
- Foam tape: This will give dimension to your focal image. Double-sided tape or mounting squares can also be used.
- Stamping tool or acrylic block: This ensures precise placement of your stamps. If you don’t have one, you can use an acrylic block
- Sentiments: “Tropical” from the StudiolightNL set and “Birthday Wishes” from Inkadinkado Baby set. These sentiments add a personal touch to your card. Alternatives include hand-lettered sentiments or other stamps that fit your style.
Tips and Ideas
Think about your colour palette before you start colouring. Bright, tropical shades will help your pineapple card pop.
Sprinkle on some extra magic with glitter, sequins, or enamel dots—these playful embellishments add sparkle, texture, and a dash of personality to your handmade birthday card.
Step-by-Step Tutorial: Bring Your Tropical Birthday Card to Life
Are you ready to create a bright, cheerful tropical birthday card?
I’ll walk you through each stage: stamping and colouring the pineapple, creating a tropical background with playful splatters, and assembling your card. By the end, you’ll have a handmade card full of colour, dimension, and tropical charm.
Throughout this tutorial, you will learn techniques like alcohol marker colouring, ink blending, and water splattering to create a dimensional, colourful tropical card.
Step 1: Stamp and Colour Your Tropical Pineapple
The first step is to stamp and colour your main image: a cheerful pineapple surrounded by leaves and flowers. For this, I used the pineapple from the “Take Me to the Ocean” Tropical Summer stamp set on white DCP paper with Memento Tuxedo Black ink. Using a stamping tool makes it easy to achieve a crisp, precise image, but an acrylic block works just as well.
Stamping Your Pineapple
- Place your white paper in your stamping tool.
- Ink up the stamp with Memento Tuxedo Black and stamp it onto the paper.
- Repeat if necessary to get a sharp, clean image.
Colouring with Alcohol Markers
Once your image is stamped, you can bring it to life with colour. I used Twinmarkers from Decotimecrafts, but feel free to use whatever you have on hand—alcohol markers, coloured pencils, or even water-based markers all work beautifully. For the best result, build up colour gradually with light strokes, moving from dark to light, so you get soft blends without harsh lines.
Palette I used:
- Pineapple leaves: Matcha Tea (165), Pale Green (59), Vivid Green (46), Deep Green (52), Dark Green (51), Frost Blue (182)
- Flowers: Pastel Pink (17), Pale Pink (09), Rose Pink (08), Cherry Pink (05)
- Palm leaves: Yellow Green (48), Grass Green (47), Forest Green (50), Deep Green (52)
- Additional leaves: Turquoise Green Light (57), Spectrum Green (172), Emerald Green (55), Turquoise Green (53)
- Pineapple body: Mustard (30) and Canaria Yellow (45), shadows with Warm Grey 2 & 3, brown shades: Terra Cotta (21), Pale Olive Green (41), Sand (107), Dark Wood (119), Walnut (100)
Adding Highlights and Finishing Touches
Add small highlights with a white gel pen on the pineapple and flowers. Keep it light—tiny dots and short lines work well. Let the ink dry.
Carefully fussy cut the coloured image. Turn the paper, not the scissors, for smooth edges. Leave a thin white border if you like.
Set the piece aside, ready for the next step.

Tip: Beginners can simplify their work by using fewer colours, while advanced crafters can layer and shade to create extra depth. This is a fun way to practice alcohol marker colouring and create a vibrant focal point for your tropical birthday card.
Step 2: Create a Bright Tropical Background
Next, let’s create a bright background that makes your pineapple and flowers stand out. Using Distress Inks—or any blending inks you have—blend a soft gradient across your panel. Then, add a few water splatters to give extra texture and enhance the playful, tropical feel.
Prepare Your Background Panel
Cut a piece of smooth white paper to 9.5 × 13.8 cm. This panel will serve as the base for your ink blending and water effects.
Blend the Inks
Start by blending Mustard Seed Distress Ink from the bottom of the panel up toward the middle using light circular motions with your brush. If you see patchy spots or streaks, don’t worry—just add a little more ink and blend gently until the colours smooth out. You can also use a clean, dry brush to soften any edges. Remember, blending takes a bit of practice, and every background will look unique, which adds to the handmade charm.
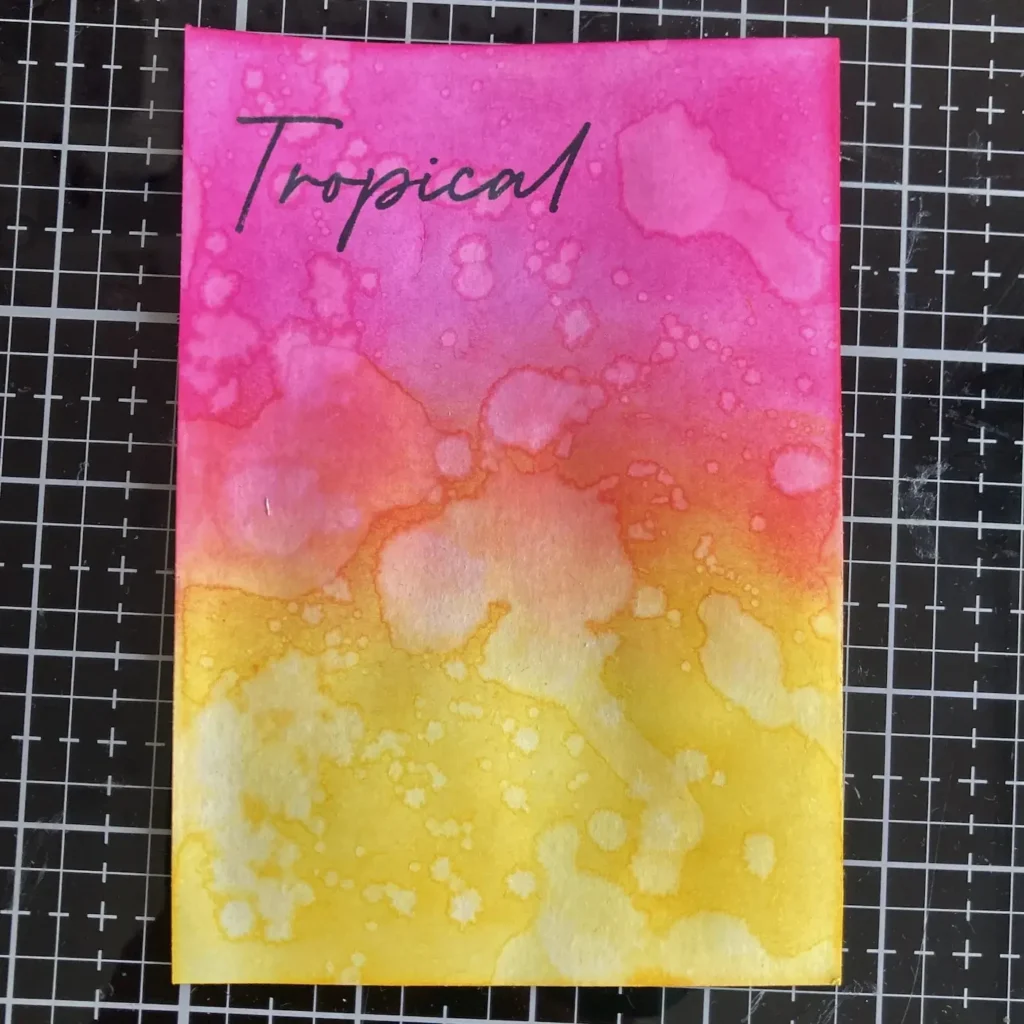
Next, add Picked Raspberry to the top of your panel and gently blend it down over the yellow. Work in soft, circular motions so the colours merge seamlessly, creating a smooth, sunny gradient that feels bright and cheerful—just like a tropical sky.
You’ll end up with a gorgeous gradient that flows from sunny yellow to soft orange and then to bright pink—giving your card that cheerful, tropical vibe you were aiming for.
Add Water Splatter for Texture
Distress Inks react wonderfully with water. To create larger drops, wet your fingers slightly and flick them over the panel. For smaller droplets, use a brush or paintbrush. The splatters will add visual interest and mimic the lively feel of tropical designs
Dry and Finish
Allow the panel to dry completely before moving on to the next step.
Tip: Make the background your own! Keep colours soft for a gentle look or go bold for a vibrant, eye-catching effect. Adjust blends and splatters to match your style and the mood of your tropical birthday card.
Step 3: Stamp Your Tropical Sentiments
After creating your vibrant background, move on to adding the sentiments that bring your tropical birthday card to life. Start by positioning the words on the panel before attaching the pineapple, so everything sits neatly and reads in the right order. Take a moment to step back or squint from a distance to check the balance and make sure your design pops.
Plan Your Placement
Use your stamped pineapple as a guide for where the sentiments will go. I placed the word “Tropical” in the top left corner to create balance and flow.
Stamp with Precision
I used a stamping tool for accuracy, but an acrylic block works well too. Position your stamp where you want it, remove the pineapple, close the stamping tool lid, apply Memento Tuxedo Black ink and press down. Repeat this process if needed for a crisp impression.
Add the Birthday Wishes
For the “Birthday Wishes” sentiment, I placed the stamp beneath the pineapple. Use the same technique: plan your placement, ink the stamp, and press carefully
Alternative Ideas
Feel free to swap these sentiments for other greetings or experiment with different fonts and styles. You could also try hand-lettering or printed sentiments for a more personal touch.
Tip: Stamp your sentiments first to keep everything neat, avoid smudges, and ensure your handmade birthday card looks polished.
Step 4: Assemble Your Handmade Tropical Birthday Card
Now that your stamped and coloured pineapple is ready, your background is blended, and your sentiments are in place, it’s time to bring your tropical birthday card together. Layering, adding dimension, and finishing touches are where all the pieces come to life, and you arrange them exactly how you like.
Add Dimension with Foam Tape
Stick some foam tape on the back of your stamped and coloured pineapple. Then gently press it onto your blended background panel—this will give your card a nice, raised, dimensional effect.
Tip: Foam tape is optional; you can also adhere your image flat if you prefer a simpler style.
Layer on Black Cardstock
Cut a piece of black cardstock to 10 × 14.3 cm and layer your colourful background on top. The black makes the pink and yellow pop! Once that’s done, attach the layered panel to your white card base for a polished, finished tropical birthday card that’s ready to impress..
Optional Finishing Touches
Add glitter, ribbon, or enamel dots to give your handmade birthday card extra sparkle and texture. Have fun experimenting with different embellishments—choose what feels right for your style or to match the personality of the person you’re making it for.
")
And just like that, you’ve got a bright, cheerful pineapple birthday card full of tropical fun. It’s ready to bring a smile and a little sunshine to someone’s special day.
Tips and Tricks for a Perfect Tropical Birthday Card
Making a tropical birthday card can be such a fun experience, and with a few extra tips and tricks, you can make yours even more special. These ideas will help you get great results and add personal touches that make your card truly one-of-a-kind.
Colouring Techniques for Beginners and Advanced Crafters
- Beginners: Start simple by using just a few colours and light layers. Blend gently to create smooth, even transitions in your pineapple and leaves. Don’t worry about perfection, as every card will look unique. Before you start, consider jotting down a personal goal, such as “practice two-tone leaves.” Setting a small ambition can enhance your experience as you decide on the beginner or advanced path.
- Advanced: Play around with shading, layering, and subtle highlights to add depth. Try mixing warm and cool tones in the foliage or flowers to make your pineapple birthday card pop and showcase your creativity.
Material Alternatives and Creative Variations
No alcohol markers? No problem! You can use coloured pencils, water-based markers, or even watercolours—you’ll still get a lovely, vibrant effect on your tropical birthday card.
Feel free to swap out your stamps for digital prints, other tropical motifs, or even your hand-drawn illustrations. Get creative and make your handmade birthday card truly your own!
If you don’t want to use foam tape, you can stick your pieces flat instead. You could also try dimensional dots for a little extra lift and variety.
Inspiration from Other Pineapple Birthday Cards
Check out other tropical designs to spark your creativity. Browse Pinterest boards, join crafting groups, or follow card-making blogs to find ideas for layering, colour combos, and fun embellishments you can try on your tropical birthday card.
Add names, ages, or short messages to make your tropical birthday card extra special and personal.
You can also change the colour palette or motifs for other occasions. For example:
- A summer thank-you card or tropical-themed party invitation.
- Holidays like Christmas by using red and green colours or adding seasonal embellishments like snowflakes.
- Valentine’s Day with pink shades and heart motifs.
- Weddings by choosing elegant fonts and adding gold or silver accents for a luxurious touch.
These adaptations make this tutorial versatile, so you can enjoy creating unique cards all year round.
These tips will help you craft a polished tropical birthday card, and they give you the confidence to make each one uniquely yours.
Let’s Be Creative Together
In this tutorial, we’ve covered how to stamp and colour a pineapple, blend a vibrant background, add playful splatters, stamp sentiments, and assemble with dimension—techniques suitable for a range of experience levels.
Now it’s your turn! Grab your supplies and create your handmade birthday card. Share your design in a challenge, on social media, or with friends—and don’t hold back. Experiment with different fruits, mix up the colours, or try a new layout. Make your card bold, playful, and completely yours!
With a bit of creativity and these tips, your tropical birthday card can brighten someone’s day, add a splash of colour, and share a playful, joyful vibe they’ll love.
More Tropical birthday card ideas
If you enjoyed creating this card, you might like to explore these related tutorials and ideas:


These posts are full of ideas, techniques, and tips to keep you inspired and creating beautiful handmade birthday cards. Explore them for fresh inspiration and let them spark your next creative project!
Links of products I used
Here I will link all the products where I have found links, so you can also buy them yourself. Some links are affiliate links. If you buy something through one of these links, I may earn a small commission at no extra cost to you. I only recommend products I use or believe in.
If I haven’t linked a product here, unfortunately, I couldn’t find any shop links.
Products with affiliate links.
Distress ink Picked Raspberry

Distress ink Mustard Seed

Memento Tuxedo Black ink

Products without affiliate links
Take me to the Ocean Tropical summer from Studiolight

I would like to enter my card in the following challenges
- A Place To Start: Anything goes + summer twist
- Try it on Tuesday: Summer
- The Paper Shelter: Anything goes
- CREATIVE INSPIRATIONS: Anything goes
- Alphabet Challenge Blog: The I is for ink blending
- 613 Avenue Create: Anything goes + summer fun
- A Perfect Time To Craft Open Challenge: Anything goes
- Carlin’s Kaartenparadijs: Alles Mag (anything goes)
- Classic Design Challenge Blog: Anything goes + Happy Birthday
Fantastic project! The coloring is wonderful. Thanks so much for sharing with us at A Place to Start. I’m looking forward to trying your tutorial!
Hugz,
Chana Malkah, Owner
Thank you so much Chana Let me know if you did the tutorial and what you have made.
Wow, the colors are brilliantly done and you’ve really got a great ink blend with your inks and I love the water drop effect over it! Thanks so much for sharing your creation with us at the Alphabet Challenge! Hope you’ll join us again for our new challenge!
Thank you so much Vicky. Glad you like it.
Gorgeous Birthday card! Love the deep rich colors, very pretty! Thanks for sharing with us @ The Alphabet Challenge.
Thank you.
prachtig kaartje Renske. Bedankt dat je meedoet met de Challenge bij Carlin’s Kaartenparadijs.
Groetjes,
Karin
Dank je wel Karin.