
It might still be the middle of the school year, but now is the perfect time to start planning your back to school card idea. Why leave it to the last minute when you can get ahead and have everything ready before the new term starts? This tutorial will walk you through creating a fun and creative back to school card idea that captures the spirit of the season.
I created this card as part of my team effort for the Penny’s Paper Craft Challenge, and I’m excited to show you how I brought this fun design to life. In this step-by-step guide, you’ll learn how to use digital stamps from All Dressed Up Stamps, along with simple stencil and stamping techniques, to create a card that stands out.
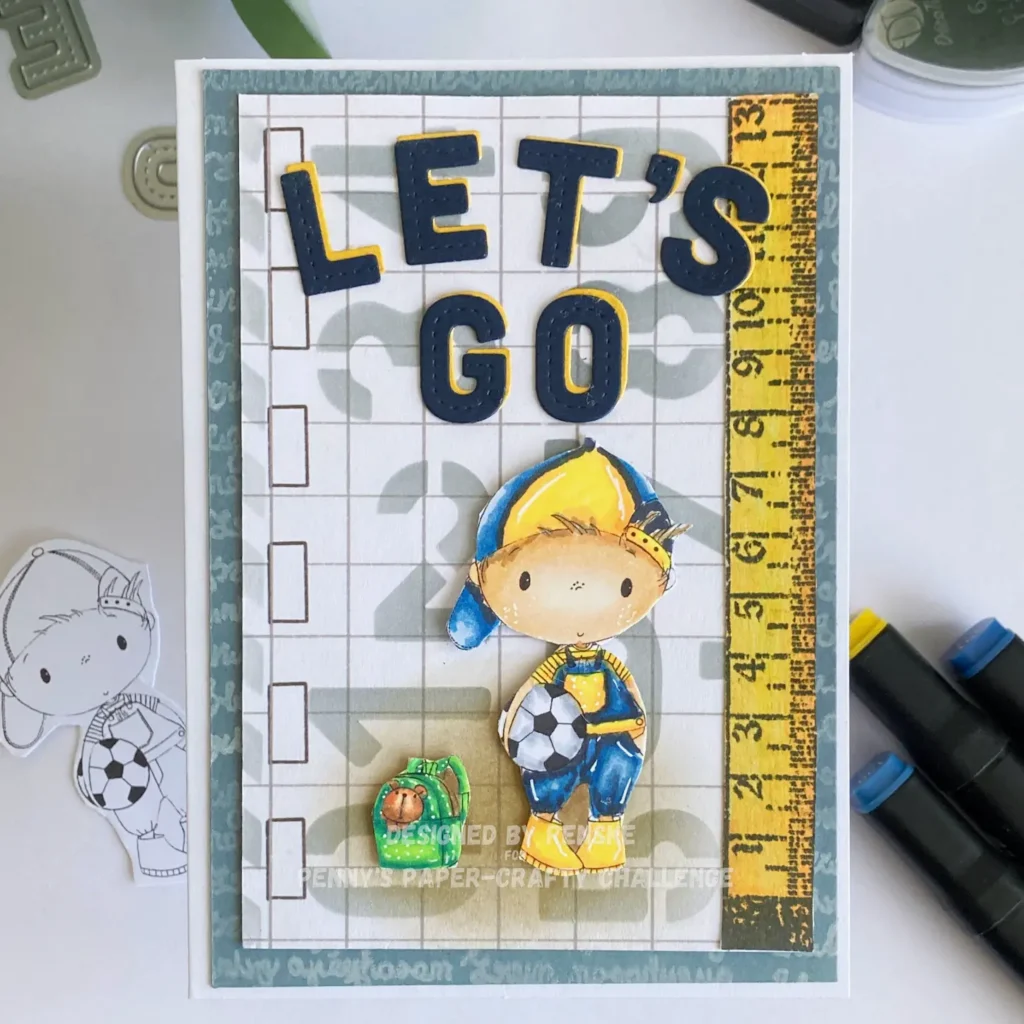
The card features the “Back to School Boy” digital stamp from All Dressed Up Stamps, showing a boy in striped overalls and a cap, holding a ball, with a teddy bear peeking out of his school bag. It’s a design that brings the excitement of school days to life.
Thanks to the support of All Dressed Up Stamps and Colour of Love, this card came together perfectly. Their high-quality products were key in bringing the design to life, and I’m excited to show you how they elevate the card.


Whether you’re new to card-making or an experienced crafter, this tutorial is great for adding your personal touch to a back-to-school card. Let’s get started and craft together.
Introduction to Back to School Card Design
Creating a back to school card idea is a great way to celebrate the start of the new school year or suprise someone with a thoughtful note as they embark on their academic journey
Materials Overview
Below is a list of the materials I used for the Back-to-School Boy card, along with alternatives you can try if you don’t have everything listed.
- Digital stamp: Back to School Boy from All Dressed Up Stamps
- Alcohol markers (I used Decotimecrafts markers for colouring)
- Alternative: If you don’t have alcohol markers, watercolour pencils or coloured pencils are great options.
- White gel pen: For a clean, crisp finish.
- Alternative: If you don’t have a white gel pen, a white pencil or paint marker will work well for highlights. Alternatively, a white craft ink pad can be used with a sponge dauber for a softer effect.
- Scissors: * For cutting out the stamped image.
- Alternative: If you don’t have scissors, a craft knife with a cutting mat can be used to trim around the image.
- Grey card stock: For the first layer on the card and to stamp on it.
- Alternative: Any colour of card stock will work, but grey is a great neutral option. Light brown, cream, or soft blue can also work for a similar effect.
- Patterned paper: to create a background for this back to school card.
- Alternative: If you don’t have this specific paper, any patterned paper with school-related designs (like numbers, pencils, or books) would be perfect. You can also create your own background by stamping patterns or using stencils.
- Stencil numbers: From Craftsensations to add fun accents.
- Alternative: If you don’t have this stencil, you can use a die set with number dies, stamp numbers, or simply handwrite the numbers on your card.
- Cloud Grey ink: From Decotimecrafts for a soft background effect.
- Alternative: Any light grey or blue ink will work to create a soft background. Distress Inks are a great alternative for a distressed look.
- Fantasy clear stamp From Coosa Crafts Nice Stamps for extra decorative details.
- Alternative: Use any clear stamp with the writing theme you have.
- Clear stamp of a ruler from Hobbyidee for a school-themed touch.
- Alternative: If you don’t have a ruler stamp, look for a stamp with school-related icons such as books or pencils, or a chalkboard design.
- Versacraft white ink: Ideal for subtle, chalky effects.
- Alternative: If you don’t have Versacraft, any white ink pad will work, although it might not provide the same chalky finish. You could also use white embossing powder for a raised, textured look.
- Memento Tuxedo Black ink: For crisp outlines.
- Alternative: Any black dye ink will work; if you prefer waterproof ink for colouring, try archival black ink.
- Stamping tool: Any alignment tool works fine for stamping.
- Alternative: If you don’t have a stamping tool, a regular acrylic block will suffice for stamping your images.
- Letter dies: From Aveccreative for creating a bold, back-to-school sentiment.
- Alternative: If you don’t have letter dies, you can use alphabet stamps, a sticker set, or simply handwrite the sentiment.
- Blue card stock: For added colour and contrast.
- Alternative: Any colour of card stock will work for the sentiment background; red, green, or a bright pattern could also match the overall feel of your card.
- Yellow card stock: For a cheerful pop of colour.
- Alternative: Any colour of card stock will work for the sentiment background; red, green, or a bright pattern could also match the overall feel of your card.
- Foam tape: To add dimension to your design.
- Alternative: If you don’t have foam tape, you can use foam sheets or double-sided adhesive tape, though the dimensions may be less pronounced.
- White card base: For a clean, crisp finish.
- Alternative: You can use any colour of card stock for the base, depending on the look you want to achieve. A light blue or grey card base would complement the design well.
Tip: Choosing the Right Colours
Choosing the right colours is essential for setting the tone of your card. For this back-to-school card, I selected a mix of blue, yellow, and grey. Blue conveys calmness and serenity, yellow adds brightness and cheerfulness, and grey serves as a neutral shade that grounds the overall design.
When selecting colours, consider the recipient’s preferences. For a younger student, vibrant colours like red, green, and orange might be more appropriate. Conversely, for a teacher, more subdued tones such as burgundy or navy may align better with their style.
Questions to Consider
Before you begin crafting, take a moment to think about the recipient and their preferences. Ask yourself:
- Who is the card for? Is it intended for a young student, a teacher, or perhaps a parent sending their child off to school?
- What style would appeal to them? Would they enjoy a playful, bright card, or do they prefer something more elegant and classic?
- What theme fits best? Are you focusing on the excitement of returning to school, or would a more understated design be more suitable?
Make sure to incorporate your personal touch into your back to school card idea when selecting materials and colours
Once you have determined the colours and style, you’re ready to bring your back-to-school card idea to life!
Step-by-Step Tutorial: Create this Back to school card idea
Now that you have gathered all your materials and decided on the colours and style you want to use, it’s time to dive into the fun part—creating your card!
In this step-by-step guide, I will walk you through the process of bringing your back-to-school card to life, from stamping and colouring to assembling the final design. Let’s get started with the first step and unleash your creativity!
Step 1: Print and Colour the Digital Stamp Back to School Boy
Let’s start by printing and coloring the image, which is where the fun begins! Here’s a step-by-step guide to get your digital stamp ready for the card.
Print the Digital Stamp
The first step is to print your digital stamp on the right type of paper. I recommend using DCP paper for this project, as it works well with alcohol markers. If you plan to use a different colouring medium, make sure to choose paper that is compatible with your preferred medium for the best results.
Colour the Image
Now it’s time to add some colour to your digital stamp! I used Decotimecrafts alcohol markers, but you can select any medium you like. Below are the colour combinations I used to bring the “Back to School Boy” image to life:
- Skin: Pale Cream (142), Salmon Pink (25), Peachy Blush (259), and Tanned Skin (260)
- Hair: Walnut (100)
- Overalls: Light Sky (189), Midi Sky (190), Dark Sky (191), and Winter Night (192)
- Boots, Belt, Bag, and Cap: Pastel Lemon (39), Lemon Yellow (35), and Yellow (34)
- Ball: Cool Grey 4, Cool Grey 3, and Colourless Blender (0)
- Bag: Yellow Green (48), Grass Green (48), and Forest Green (50)
- Teddy Bear: Sand (107), Walnut (100), and Clay (116)
Add Highlights
After you’ve coloured the image, enhance it with highlights. I like to use a white gel pen to add tiny white dots to the cheeks and bag for a cute and fun touch. Add highlights to the boots, overalls, and cap to create a little shine and dimension.
Are you a visual learner? Here is a video of this in action.
Cut Out the Image
Now that your image is fully coloured and detailed, it’s time to cut it out! I chose not to leave a white border around my image, but you can certainly do that if you prefer. Cut out the boy and the bag separately so you can position them more easily on your card.
Now that your coloured image is ready, you can move on to the next step—creating a background for your back-to-school card!

Step 2: Create the Background
In this step, we will create a textured and detailed background for your back to school card using stamping and stencilling techniques. The key here is layering to give your card extra depth and dimension.
Stamping on Coloured Cardstock – A Game-Changer
Start with the grey cardstock, which will serve as the first layer of your card. Cut the grey cardstock to 10 cm by 14.3 cm.
Next, we will add a handwritten text effect to the edges of the cardstock. Use a stamping tool for this process; however, if you don’t have one, you can still achieve a similar effect without it. If you do have a stamping tool, place the grey cardstock in your stamp platform. Position the end of the handwritten stamp along the edge of the cardstock.
Stamp using white ink, ensuring the stamp is well-inked. If the ink does not show up clearly on the grey cardstock, don’t worry. Just repeat the stamping process a couple of times in the same area to achieve a more defined look.
Continue stamping along the edges until you’ve filled the sides of the paper with the handwritten text effect. There’s no need to stamp the entire sheet since the next layer will cover most of the middle.

Using Stencils with Patterned Paper for Extra Depth
Next, we’ll work with some patterned paper to create a beautiful background. I used patterned paper from an old collection I had from Decotimecrafts, which matched the school theme perfectly. Cut the patterned paper to 9 cm by 13.4 cm.
To add some texture to the paper, we will use a stencil. Here’s how:
- First, tape the patterned paper down to your workspace. You can fold a small piece of tape on the back to keep it in place.
- Place the stencil on top of the paper and secure it with more tape.
- Using a blending brush, apply grey ink over the stencil. Be gentle and ensure you blend the ink evenly to achieve the desired effect.
- Once you’re satisfied with the look, carefully remove the stencil to reveal the pattern underneath.


To add a final touch, use distress ink (Walnut Stain and Vintage Photo) on the bottom edge of the patterned paper for a slight vintage effect. This will help ground the elements on your card when we add the coloured image later.
You can watch the video here for a visual tutorial.
Now that the background is ready, you have your layers set! Next, we’ll bring everything together by adding your main image and finishing the card.
Step 3: Make the Ruler and “Let’s Go” Text
In this step, we will create two key elements for your back-to-school card: a ruler and the “Let’s Go” text. These additions will bring the card to life, adding fun and personality.
Creating the Ruler
et’s begin with the ruler. I used a Hobbyidee stamp set that includes a ruler stamp, which is perfect for this card.
- First, stamp the ruler onto white cardstock using black ink.
- Next, add some colour. I used alcohol markers in Pastel Lemon (39), Lemon Yellow (35), and Yellow (34) to colour in the ruler. Feel free to choose any other colours that match your theme.
- Once the ruler is coloured, carefully cut it out and mount it onto your patterned paper. Trim any excess paper if necessary to ensure a perfect fit.

Let’s Go Text
Now, let’s create the “Let’s Go” text. I used alphabet dies for this, which are great for customising your cards with personalised words.
- Start by die-cutting each letter of “Let’s Go” twice: once from blue cardstock and once from yellow cardstock.
- Layer the blue letters on top of the yellow letters, offsetting the blue slightly so that the yellow shows around the edges. This will create a subtle shadow effect for the text.
- Repeat this process for each letter until you have completed the full “Let’s Go” phrase.

With the ruler and text ready, you are now one step closer to completing your card! In the next step, we will put everything together and add the finishing touches.
Step 4: Assemble the Card
Now that we have all the elements ready, it’s time to assemble the card. This is where everything comes together, and your card starts to take shape.
Attach the Patterned Paper
Begin by attaching the patterned paper to the grey cardstock with the white text. To add some dimension and make the design pop, use foam tape to secure the paper in place. This will create a nice raised effect for your card.
Position the Coloured Image
Next, take your coloured image of the boy and his bag and position it on the inked area where we added the brown distress ink. Use foam tape again to adhere to the image, ensuring it stands out and adds dimension to the card.
Add the “Let’s Go” Text
Now for the fun part—placing the text! Arrange the word “Let’s” in a slight curve and position “Go” directly underneath, keeping the letters aligned and neat. Once you’re satisfied with the placement, secure them onto the card.
Finally, attach the completed design to a white card base. This will serve as the foundation for your card, making everything stand out beautifully.

And there you have it! Your back-to-school card is now ready to be sent or given to someone special.
Let’s Get Creative together
Now that you’ve completed your card, it’s time to keep the creative journey going. There’s always something new to learn and fresh challenges to tackle. Take your inspiration and continue experimenting with different materials and stamps.
Join the Penny’s Paper-Crafty Challenge
Would you like to share your creations and have a chance to win a prize? Join Penny’s Paper-Crafty Challenge Blog! It’s a fantastic opportunity to showcase your work, admire others’ creations, and further develop your skills.
More related blogposts
Explore more back to school card ideas to keep the creativity flowing.
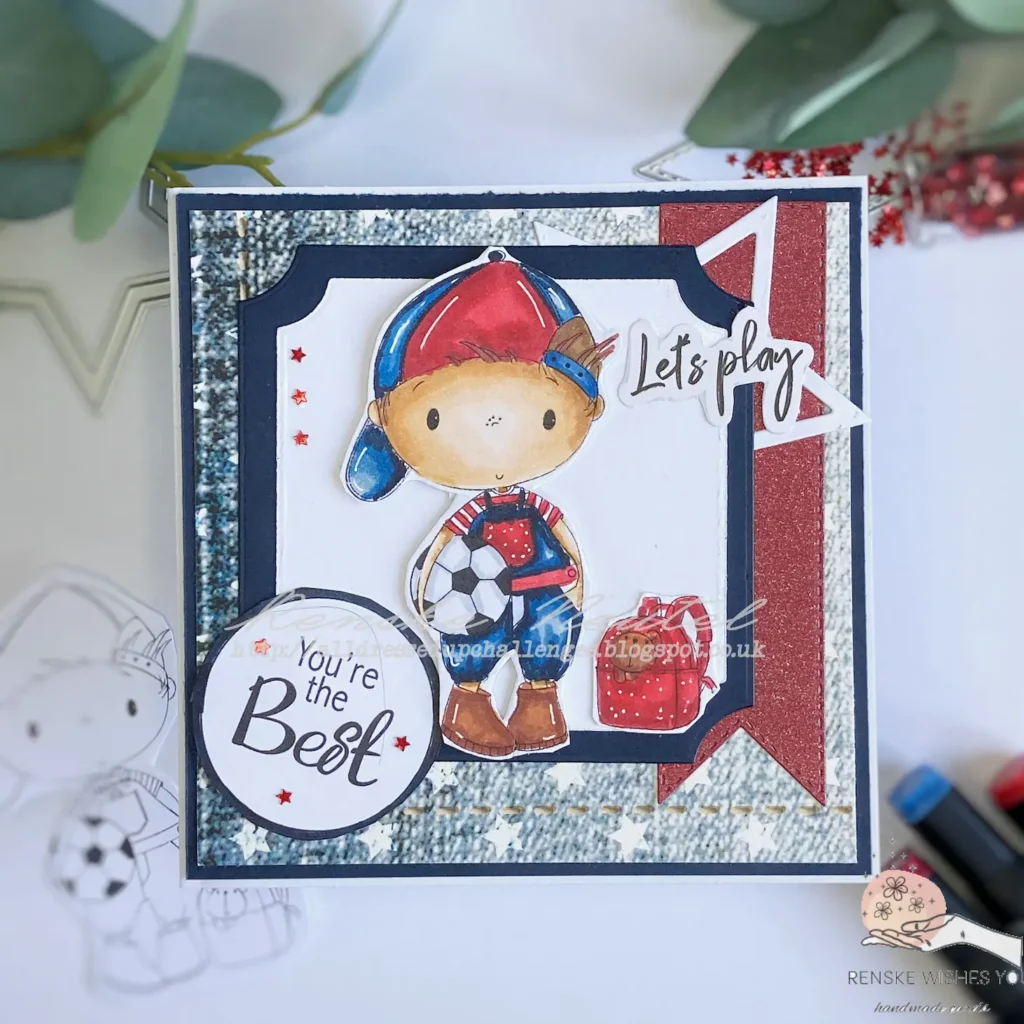
How to Make a Creative Football-Themed Card for Every Boy Celebration
I made another card with this digital stamp Back to School Boy. This card is a football themed card. You don’t have to use it for a back to school card idea.

Handmade Back To School Card: Spread Joy On The First Day!
Another Back to School card with a digital stamp from All Dressed Up Stamps
Happy Crafting!
Products used for this back to school card idea
Affiliate Disclosure: In some of the links in this post, I may earn a small commission if you make a purchase through them, at no extra cost to you. I only recommend products I genuinely believe in, and your support helps me continue creating content for this blog. Thank you for your support!
Products with affiliate links
Back to School Boy Digital stamp

Distress Ink Walnut Stain

Distress Ink Vintage Photo

Versacraft white ink

Memento Tuxedo black ink

Ink Blending brushes Studiolight NL

Blending Brush Nellie Snellen

White GelPen

Products without affiliate links
- Clear Stamp Choosa Craft (couldn’t find a link anymore)
- Clear Stamp set from Hobbyidee (couldn’t find a link anymore.
- Alcohol markers from Decotimecrafts
- Patterned paper from the Luxe Paperblock Decotimecrafts
- Cloud Grey ink from Decotimecrafts
- Stamping tool (brand unknown).
- Letter dies from Aveccreative
- Blue Card stock (brand unknown.
- Yellow Card Stock (brand unknown).
- Foam Tape (brand unknown)
- White Card base (brand Unknown).
I would like to enter my card in the following challenges
- Unicorn Challenge Blog: Use Dies
- Craft Rocket Challenges: Layer it up
- Allsorts challenge blog: Anything goes + stencils and masks
- Lil Patch of Crafty Friends Challenge …: Anything goes
- 613 Avenue Create: Anything goes + splash of colour
- A Perfect Time To Craft Open Challenge: Anything goes
- Crafts Galore Encore Challenge Blog: Anything goes
- Daisy Chain Challenges: Not Square
This is just too cute!!!!!
Thank you so much. Glad you like it.
Hi Renske, a fun card to return to school, love the layered background you created. Thank you for joining us at Lil Patch of Crafty Friends, good luck in the prize draw… Megan DT LPoCF
Thank you so much
Fabulous card – love that ruler down the edge!
Thanks for joining us at the Crafts Galore Encore Challenge.
Helen x
DT
Thanks a lot Helen
Cool card!! Thanks so much for participating in our 613 AVENUE CREATE challenge!!! I appreciate that you play along and I enjoy visiting your blog!! Have a happy crafty day!! Deanne at A Little Bit O’ Paper
Thank you so much for your lovely comment
Wow, this is a super cool back to school card idea! Thank you so much for playing along with our 613 Avenue Create.
Rosi x
Do you already know the Dream Factory Challenge ?
Thank you so much
Great card! Thanks for sharing with us at Allsorts challenge.
Thank you so much
A super cute card and lovely design. Thank you for joining in at Allsorts.
Thanks a lot