
Some links in this post are affiliate links. This means I may earn a small commission if you make a purchase, at no extra cost to you. I only recommend products I use and genuinely enjoy in my own cardmaking. Read more here.
Create a stunning autumn fox card with my easy-to-follow fox card tutorial. As autumn’s vibrant colours appear, it’s time to embrace the cosy hues of the season. Even though summer is still here, this guide will help you prepare for fall with a beautiful card that captures autumn’s essence.
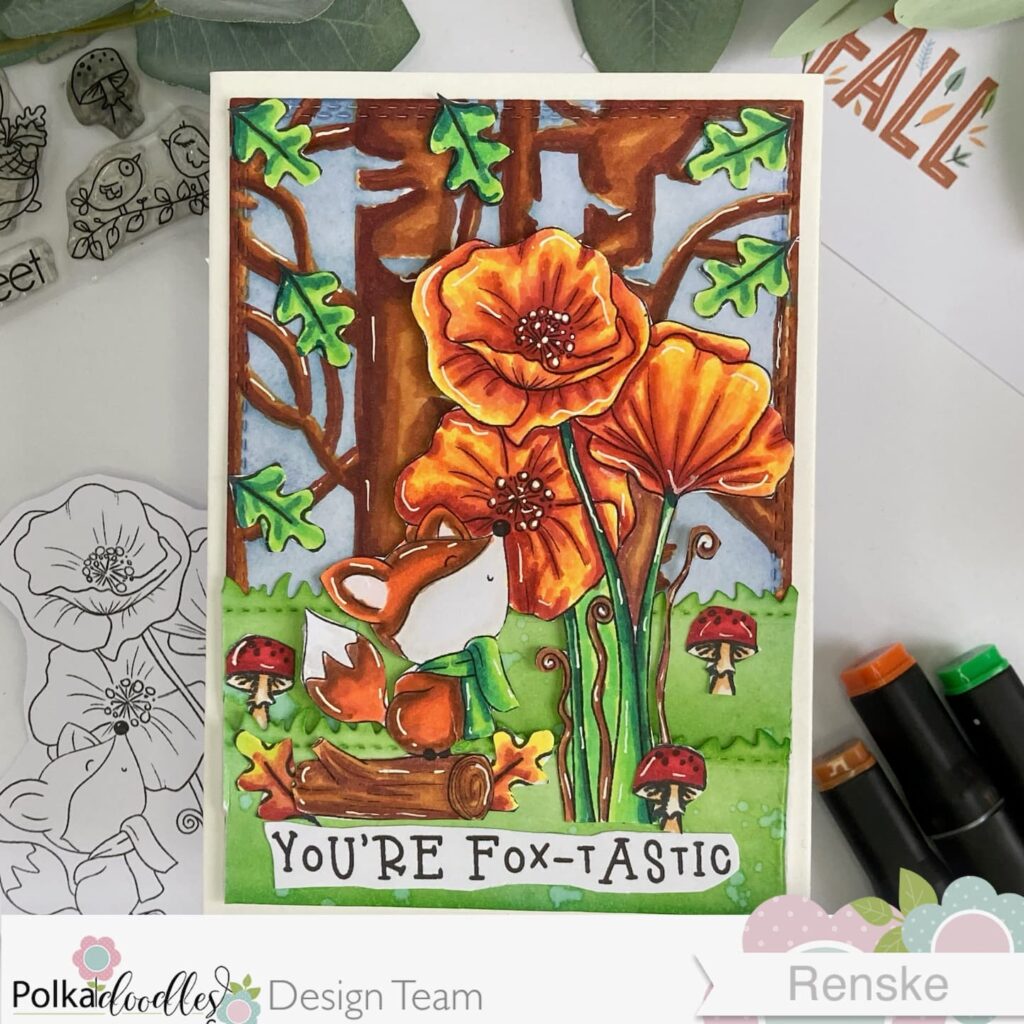
I crafted this particular card as part of my role on the Polkadoodles design team. Our challenge was to create projects that highlight autumn colours. While the Polkadoodles Challenge always embraces the theme “Anything Goes,” our task was to focus on the beautiful shades of fall.
In this blog post, you’ll find a detailed guide on how to craft your autumn fox card using Polkadoodles digital stamps and other readily available materials. Each step is designed to be clear and enjoyable, ensuring you can create something special without hassle. Let’s dive in and start crafting your gorgeous autumn fox card!
- Materials and Tools
- Polkadoodles Products
- General Supplies
- Step-by-Step Tutorial: Craft Your Stunning Autumn Fox Card
- Step 1: Printing and Coloring the Digital Stamp Poppy Flowers Autumn Fall Fox.
- Step 2: Creating the Background
- Adding Highlights
- Step 3: Making the Grass Panels
- Step 4: Adding Leaves and Mushrooms
- Step 5: Adding the Sentiment You're Fox-tastic
- Step 6: Assembling the Autum Fox Card
- Let's Get Creative Together
- Polkadoodles in the spotlight
- I would like to enter my card to the following challenges:
Materials and Tools
Gather these Polkadoodles products and general supplies to create your autumn fox card. Here’s what you need and how each item enhances your card:
Polkadoodles Products
- Digital Stamp: Poppy Flowers Autumn Fall Fox. A charming fox amidst autumn foliage, perfect for capturing fall’s essence.
- Sentiment: Autumn Fall Greetings. A heartwarming message to personalize your card.
- Clear Stamp Set: Nuts About You Woodland Fox. Features leaves and mushrooms to enhance your autumn scene.
General Supplies
- Alcohol Markers: For vibrant, fall colors and added depth—alternatives: Colored pencils, watercolour paints, or crayons.
- Distress Inks: Pine Needles, Mowed Lawn, Stormy Sky, Chipped Sapphire. These inks help create a beautiful, atmospheric background with rich autumnal tones. Alternatives: Any dye-based inks or watercolours can create a similar effect.
- Blending Brush – Applying ink smoothly and creating a gradient effect in your background. Alternatives: Any dye-based inks or watercolours can create a similar effect.
- Stencil: Trees – Helps to add texture and create the forest background for your autumn scene. Alternatives: You can hand-draw tree silhouettes or use tree-themed embossing folders.
- Grass Die, Rectangle Die – These dies are used to cut out grass elements and the background panel of your card. Alternatives: Scissors and a ruler can be cut out manually if dies are unavailable.
- Paper Trimmer: Cut your card base and panels to the right sizes. Alternatives: A craft knife and ruler can also be used for precise cutting.
- Stamping Platform – Ensures precise placement and even stamping of your sentiments and additional elements. Alternatives: Clear acrylic blocks can be used for stamping if a stamping platform is not available.
- Foam Tape (or Paper for Elevation) – Adds dimension to your card by elevating elements like the fox and grass panels, making them stand out. Alternatives: You can stack layers of cardstock or use small pieces of cardboard for a similar effect.
- White Gel Pen – Perfect for adding highlights and details to your coloured images, enhancing their appearance. Alternatives: White acrylic paint or a white coloured pencil can be used for adding highlights.
Having all these materials ready will make the crafting process smoother and more enjoyable. Let’s start with the fox card tutorial and have some crafting fun!
Step-by-Step Tutorial: Craft Your Stunning Autumn Fox Card
I’ll guide you through creating this charming card that captures the cosy essence of fall. Each step is easy and enjoyable. From printing and coloring your digital stamp to assembling the card, you’ll create a beautiful autumn piece. Let’s start crafting!
Step 1: Printing and Coloring the Digital Stamp Poppy Flowers Autumn Fall Fox.
In this first step, you’ll learn how to print and colour the digital stamp to bring your autumn fox card to life. This stage sets the tone and vibrant details for your card.
Printing the digital stamp
Start by printing the digital stamp on DCP paper, specially designed for use with alcohol markers. This paper will ensure that the ink doesn’t bleed and the colours come out vivid.
Colouring the digital stamp.
Use alcohol markers to colour your printed image. Here’s a breakdown of the colours and their applications:
- Flower Stems and Scarf: Apply a mix of Yellow Green, Grass Green, Forest Green, and Dark Green to create rich, natural tones.
- Flowers: Use English Red, French Vermillion, Orange, Yellow, and Lemon Yellow to give your flowers a bright, autumnal look.
- Fox: Color the fox with Carrot Orange, Orange, Red Barn, Rose Beige, and Clay for a warm, realistic fur effect.
- Light Parts of Fox: For highlights and subtle shading, use Cool Grey 1, Leather, and Colorless Blender.
- Tree Trunk: Add depth to the tree trunk with Sand, Rose Beige, Burnt Sienna, and Natural Oak.
Adding Highlights
Once your colouring is complete, use a white gel pen to add highlights to the flowers, fox, and tree trunk. This technique will make the elements stand out and give them a polished look. Don’t forget to add white dots to the centre of the flowers for an extra touch of detail.
Cutting Out
After the ink is dry, carefully cut out the coloured image. This will be the focal point of your card, so take your time to ensure clean, precise edges.

These steps will help you achieve vibrant and beautifully coloured elements that make your handmade fox card stand out. Next, we’ll create the background to complement your colourful image.

Having trouble editing or colouring digital stamps? Download my free guide for extra tips and tricks to help you perfect your digital stamps!
Step 2: Creating the Background
In this step, you will create a beautiful woodland scene to serve as the backdrop for your autumn fox card. This will add depth and context to your card design.
Stencilling
Start by creating the forest background using a tree stencil. The stencil will help you design the placement of the trees, and you will use Distress Inks to fill in the areas around the stencil to create the sky.
Use Distress Ink in Stormy Sky for the base sky colour and Chipped Sapphire to add depth around the edges.
- To start, secure your panel to your work surface with a bit of tape folded in half, so it doesn’t shift.
- Place the stencil over the panel and secure it with additional tape to prevent movement.
- Apply Stormy Sky to cover the open areas of the stencil, then use Chipped Sapphire around the edges to create a gradient and add depth.


Colouring Trees
Once the stencilled sky is complete, move on to colouring the trees. While you could leave the trees white, adding colour will make them stand out and blend better with your scene.
- Use alcohol markers for the trees, starting with Sand as the base colour to fill in all the tree trunks. Apply this lighter colour first to lay down a foundation.
- Next, add depth and shadows using Burnt Sienna and Natural Oak. Focus on the edges and the base of the branches for the darker tones
- Blend the colours from dark to light, finishing with highlights using a white gel pen.

Adding Highlights
To give your trees and background a finished look, use a white gel pen to add highlights. This will bring out details and make the elements stand out against the background. Apply highlights to the edges of the tree trunks and branches to mimic light and enhance the overall effect.
With your autumn background complete, we can create the grass pieces.
Step 3: Making the Grass Panels
Add depth and texture to your card, start by creating two layered grass panels. This step gives your autumn fox scene a grounded and dimensional look.
Die-Cutting and Coloring
- Begin by die-cutting two grass panels from white paper using a grass die. These panels will form the base of your foreground.
- nce cut, use blending brushes to apply color. Start with Mowed Lawn over the entire surface of both grass panels. For added depth, use Pine Needles along the edges and bottom of the panels.
- To enhance the texture, flick some water droplets onto the inked grass, allowing it to react and create a speckled effect.
Assembling Grass Panels
- Attach the grass panels to your background to complete the scene. Place one panel directly onto the background, securing it with adhesive.
- For the second panel, elevate it to add dimension. You can use foam tape for this, but if you’re out, an easy alternative is to stack small pieces of paper to create a similar lift. Simply glue four layers of paper together and attach it to the back of the grass panel. This technique adds dimension without needing foam tape.
With the grass panels in place, you can create the extra elements for the card using the clear stamp set “Nuts About You.”
Step 4: Adding Leaves and Mushrooms
Add elements to enhance your autumn fox card using the Nuts About You clear stamp set. Include details like leaves and mushrooms to create a charming forest scene.
Stamping and Coloring
To begin, stamp eight leaves and three mushrooms onto white paper using the Nuts About You clear stamp set. Then, colour them using the following markers:
- Green Leaves: Use Yellow Green, Grass Green, and Forest Green for a vibrant, layered effect.
- Red-Yellow Leaves: Apply English Red, Orange, and Lemon Yellow to create warm, autumn hues.
- Mushroom Tops: Color the tops with Burgundy, English Red, and Cardinal for rich, earthy tones.
- Mushroom Undersides: Use Pale Cream and Sand to give the undersides a subtle contrast.
Adding Highlights
After colouring, use a white gel pen to add highlights to the mushrooms and leaves, bringing out the details and adding brightness. Once you have added highlights, carefully cut out each element.
With these elements ready, you can now proceed to work on the text for the card.
Step 5: Adding the Sentiment You’re Fox-tastic
Finish your autumn fox card with a playful sentiment for a personal touch and to reinforce the theme.
- Printing and Cutting: Start printing the sentiment “You’re fox-tastic” from the Autumn Fall Greetings set. After printing, carefully cut out the sentiment using scissors. This phrase adds a charming and seasonal touch to your card.
- Placement: Position the cut-out sentiment on the lower part of the grass panel. Attach it securely using glue or double-sided tape. Placing the sentiment here ensures it stands out and complements the overall design of your card.

With the text ready, we can move on to the final step of placing all the elements on the card
Step 6: Assembling the Autum Fox Card
Combine all elements to bring your autumn fox card to life and create a cohesive, charming final product.
Creating the Card Base
First, create the card base. You can either use a pre-made one measuring 10.5 cm x 14.8 cm or make your own by cutting a piece of paper to 21 cm x 14.8 cm, scoring it at 10.5 cm along the longer side, and folding it in half to form the card base.
Placing Elements
Begin assembling the card by placing the sentiment, digital stamp, grass panels, leaves, and mushrooms on the background panel. Attach the sentiment to the lower part of the grass panel and position the digital stamp so that its lower part aligns with the bottom grass panel and the upper part extends over the rest of the panel. Use small layers of paper on the back of the stamp if needed for elevation.
Final Assembly
Once the elements are in place, adhere the background panel to the card base using strong adhesive. Your beautiful autumn fox card is now complete!
")
The Fox card tutorial is now ready. Enjoy the process of creating this cute autumn fox card.
Let’s Get Creative Together
Crafting a card is a fantastic way to express creativity and embrace the changing seasons. I hope this autumn fox card tutorial inspires you to bring the vibrant colours of fall to life. Each step shows how a few simple techniques can turn basic materials into a charming seasonal masterpiece.
Join the Polkadoodles Challenge
Now it’s your turn to get creative! Start crafting your autumn-themed card today using this tutorial! Share your beautiful creations and enter the Polkadoodles Challenge now. The theme is always ‘Anything Goes,’ so unleash your creativity. Visit Polkadoodles Challenges to showcase your work and be part of our vibrant crafting community!
More Autumn Card Designs Inspiration
Looking for more autumn card design ideas? Check out these related blog posts for additional inspiration and tutorials:

Autumn Gnome Card Tutorial: Crafting and Enchanting Fall Scene
I used the same stencil for this card but now I left the trees white. I also used Polkadoodles digital stamp and the nuts clear stamp set here.
Happy crafting, and enjoy the vibrant beauty of autumn in your cardmaking!
Polkadoodles in the spotlight
Affiliate Disclosure: This post contains affiliate links, which means I may earn a small commission at no extra cost if you purchase through these links. I only recommend products and services that I use and trust. Your support helps me continue to provide free tutorials and creative inspiration. Thank you for supporting my blog and helping me to keep sharing my passion for card making!
Poppy flowers Autumn Fall Fox

Nuts About you clear stamp set

Autumn Fall greetings, sentiment printable stamp

I would like to enter my card to the following challenges:
- Dream Valley Challenges: Anything goes
- Simon Says Stamp Blog Wednesday challenge: Anything goes
- Krafty Chicks Challenge: All Occasions
- My Time To Craft!: Something tree-lated
- The Cutie Pie Challenge Blog: Four-legged friends