
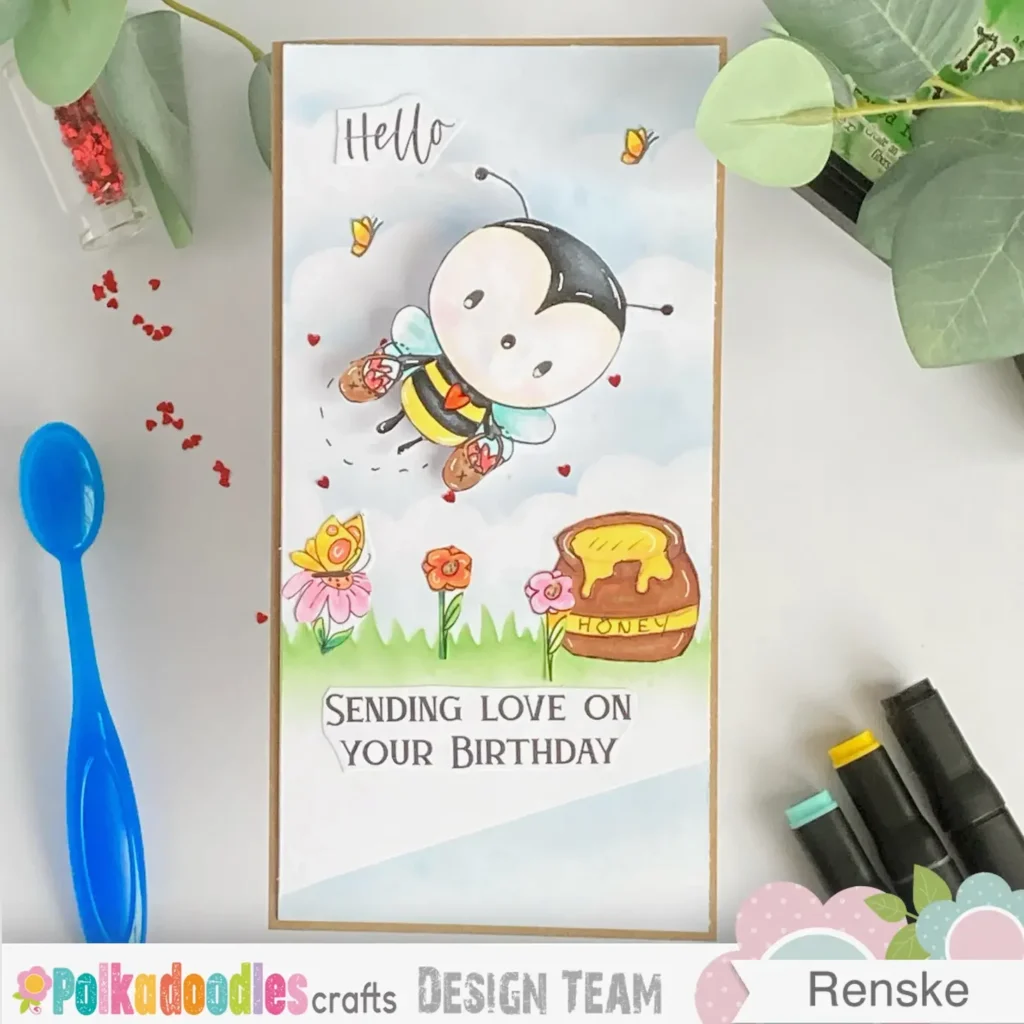
Do you want to add movement to your cards? In this tutorial, I’ll show you how to make a handmade bee birthday card with a wobble surprise. This interactive slimline card features adorable digital stamps from Polkadoodles.
You don’t need experience with wobble cards to follow along. I’ll walk you through each step. You’ll learn how to colour your digital stamps with alcohol markers, blend beautiful backgrounds using distress inks, and make your wobble spring with simple supplies.
When you’re done, you’ll have a playful bee birthday card ready to give. Let’s get started!
What You Need to Make This Bee Birthday Card
Here’s what you need to make this interactive slimline bee birthday card. I’ll show you exactly what I used and offer alternatives, so you can still follow along.
Polkadoodles Digital Stamps and Products
- Too Cute Bee Heart Basket digital stamp: This bee holds two baskets of hearts and is the centrepiece of the card.
- Winnie Sunshine Delight Little Friends digital stamp: I used the flowers and the butterfly from this set to enhance the scene.
- Rebel Messages with Attitude digital stamps: I incorporated the word “Hello” from the “Hello You” sentiment.
- Birthday Sentiments & Greetings digital stamps: For the sentiment, I used “Sending love on your birthday.”
- Distress Ink Mowed Lawn: This is used to create the grass background.
- Distress ink Tumbled glass (not available): This is for the soft, cloudy sky.
Tip: Mix and match Polkadoodles digital stamps to create your own bee birthday card scene.
Other Craft Supplies and Tools
- Alcohol markers: Use these to colour the digital stamps, but you can also use aqua markers or coloured pencils.
- White gel pen: To add small highlights to the images.
- Glitter glue or glitter pearls: I used these to add a subtle sparkle to the bee’s wings.
- Pencil and black fineliner: These are for sketching and outlining the honey jar I drew by hand.
- Craft card stock: This is used for the slimline card base (21 cm x 21 cm, scored at 10.5 cm).
- Grass stencil: This helps blend the grass area.
- Cloud stencil: This is used for the soft sky effect.
- Butterfly stamp: I used this for additional butterflies in the scene. Any small butterfly stamp will work.
- Paper trimmer and bone folder: These are for cutting and scoring the card base.
- Floral wire (or silver craft wire): This is used to create the wobble spring.
- Double-sided tape and strong glue: These are needed to assemble all layers and elements.
- Tweezers: These help place small embellishments and sentiment pieces.
Tip: If you don’t have a grass or cloud stencil, make your own with cardstock and scissors.
How to Make a Bee Birthday Card with a Wobble Element
In this tutorial, you’ll create a bee birthday card with a wobble surprise. I’ll guide you through each step, even if this is your first interactive card.
You’ll learn how to use Polkadoodles digital stamps, create a wobbling bee, and blend backgrounds with distress inks. I’ll also share tips to make your wobble spring.
Let’s start building this slimline interactive card.
Step 1 – Print and Colour Your Bee Digital Stamp
Let’s bring the main star of your bee birthday card to life. You’ll see how easy it is to work with digital stamps, even if it’s your first time. You’ll see how easy it is to work with digital stamps, even if it’s your first time.
Print the digital stamp
I used the “Too Cute Bee Heart Basket” digital stamp from Polkadoodles. I printed it 7 centimetres high on DCP paper. This type of paper works well with alcohol markers, but you can also use any smooth cardstock you prefer.
Colour the bee with alcohol markers
Now add colour to bring your handmade bee card to life. Here are the colour combinations I used:
- Black parts of the bee: Black, Cool Grey 9, Cool Grey 7, Cool Grey 5
- Yellow parts of the bee: Pastel Lemon, Lemon Yellow, Golden Yellow
- Wings: Cool Mint, Frost Blue, colourless blender
- Baskets: Yellow Ochre, Sand, Rose Beige
- Hearts: Cardinal, Burgundy
- Blush on cheeks: Blush
Add highlights and shimmer
After colouring, I used a white gel pen to add highlights for extra dimension. Then, I applied shimmer to the wings using glitter glue from Decotime Crafts. The glue was slightly dried out, so I used a brush for better control.
Finish with a glossy accent
To complete the look, I added paper glaze to the small heart on the bee’s body. This adds a glossy finish and extra shine to your interactive card.

Now your bee is ready for the wobble card scene.
Step 2 – Make Your Own Wobble Spring for Extra Fun
In this step, your bee birthday card gets its wobble surprise! You don’t need special supplies. I’ll show you how to create a wobble card with simple materials you likely already have.
Gather your materials
To create your homemade wobble spring, you will need:
- Silver floral wire
- Pen or pencil
- Double-sided tape
- White heavy cardstock (for the small squares)
How to make a wobble for cards
If you don’t have ready-made wobble springs, you can make your own. I used silver floral wire for this method.
- Take your pen or pencil as the base.
- Wrap the floral wire around it several times to form a small spring. Keep it compact so your interactive card stays flat.
- Use wire cutters to snip off the ends.
The spring is now ready.
Build the wobble mechanism
- Cut 4 small squares from the heavy cardstock.
- Apply double-sided tape to one side of each square.
- Take one end of the spring and sandwich it between two squares. Press firmly so it stays in place.
- Repeat this for the other end of the spring.
You’ve made your wobble spring to bring your bee card to life with interactive movement.
Step 3 – Build Your Slimline Card Base
The slimline card works well for this bee birthday card. It gives the bee space to stand out and builds a strong scene for your design.
Materials you need
- Craft card stock
- Paper trimmer
- Bone folder
How to make the slimline card base
I chose a slimline card to give the design extra room. The tall shape adds space for the bee and scene elements.
- Start with a piece of craft card stock measuring 21 centimetres by 21 centimetres.
- Score the card at 10.5 centimetres.
- Fold it in half using your bone folder to create a crisp fold.
Your slimline card base is now ready for the next steps.
Step 4 – Blend Your Background with Distress Inks
With your slimline card base, coloured bee, and wobble spring ready, it’s time to build the background scene. Layering paper and distress ink adds depth and gives your bee birthday card a playful look.
Materials you need
- White heavy cardstock (10 x 20.5 centimetres)
- Paper trimmer
- Distress Ink Tumbled Glass
- Distress Ink Mowed Lawn
- Blending brushes
- Grass stencil
- Cloud stencil
- Low-tack tape
Prepare the layers
- Cut two pieces of white cardstock to 10 x 20.5 centimetres.
- Choose one piece to be the top layer.
- Trim the top layer diagonally, starting 4 centimetres down from the top corner. This slanted cut adds interest to your bee birthday card.
Ink blend the bottom layer
- Start with the bottom piece.
- Apply Tumbled Glass distress ink with a blending brush, concentrating more ink near the cut edge and fading it toward the bottom. This soft blue layer will peek through behind your top panel.
Ink blend the top layer
- Position your grass stencil on the lower part of the top layer. Tape it down to hold it in place.
- Blend Mowed Lawn Distress Ink across the stencil with a blending brush.
- Leave the bottom section white. Here will the sentiment go.
Add the clouds
- Place your cloud stencil toward the top of the panel.
- Blend Tumbled Glass distress ink using light circular motions. Move and rotate the stencil to create a natural, playful cloud pattern.

Your ink-blended background is ready. The layers will add extra dimension to your interactive card once assembled.
Step 5 – Add Extra Embellishments and Personal Touches
Now it’s time to create the smaller elements that bring your bee birthday card to life. These details add extra interest to your bee birthday card and complete the design.
Materials you need
- Winnie Sunshine Delight digital stamp (for flowers and butterflies)
- Polkadoodles Rebel Messages with Attitude sentiment set
- Polkadoodles Birthday Sentiments & Greetings set
- Alcohol markers
- White gel pen
- Pencil
- Black fine liner
- Butterfly stamp
- Memento Tuxedo Black ink
- Printer
Create the Sentiments
I used two Polkadoodles digital sentiment sets for the greeting.
- From the Rebel Messages with Attitude set, I selected the word “Hello” from the phrase “Hello You.” You can either print the full sentiment and trim off the extra words or use the crop function in Microsoft Word to print just the word “Hello.” If you’re not sure how to do this, my freebie explains how to crop digital stamps and sentiments.
- Next, I printed “Sending Love on Your Birthday” from the Birthday Sentiments & Greetings set. Adjust the size before printing to fit your design. Once printed, carefully cut around the words with scissors.

Need help cropping digital stamps in Word?
Grab my free guide below and start editing your digital images today.
Print and Colour the Flowers
For the floral details, I cropped parts from the Winnie Sunshine Delight digital stamp.
- I isolated the flower with the butterfly and the single flower using Word’s crop function. My freebie also covers this technique if you’d like to try it yourself.
- After printing the flowers, I coloured them using my alcohol markers:
- Pink flowers: Pastel Pink, Pale Pink, Rose Pink
- Orange flower: French Vermillion, Orange, Yellow
- Flower centres: Yellow Ochre, Rose Beige
- Butterfly: Pastel Lemon, Lemon Yellow, Orange
- Leaves: Grass Green, Forest Green

After colouring, I added highlights with a white gel pen and cut them out by hand.
Draw and Colour the Honey Pot
Since I didn’t have a honey pot stamp, I drew one myself. I searched for a reference image on Pinterest and lightly sketched it with a pencil. When I was satisfied with the shape, I outlined it with a black fine-liner.
I coloured the honey pot using these alcohol marker colours:
- Pot: Yellow Ochre, Sand, Rose Beige, Natural Oak
- Honey: Pastel Lemon, Lemon Yellow, Golden Yellow
Using the black fineliner, I wrote “honey” on the label band of the pot.


Stamp and Colour the Butterflies
To add even more dimension, I stamped two small butterflies onto white paper using Memento Tuxedo Black ink. I coloured them with the same alcohol marker colours as the butterfly on the flower for a cohesive look.
Your extra embellishments are ready. Next, you’ll assemble everything into one interactive card.
Step 6 – Bring It All Together: Assemble Your Interactive Bee Card
Now it’s time to assemble all your elements into an interactive bee birthday card. This is where your card comes together.
Materials you need
- All the coloured and prepared elements
- Glue
- Heart embellishments
- Black fine liner
Build the Background Layers
Start by glueing your two background panels together. Place the angled top layer over the ink-blended base. This layered look gives your slimline card more dimension.

Arrange the Flowers and Honey Pot
- Attach the flower with the butterfly onto the grass area.
- Place the honey pot on the opposite side.
- Add one flower in front of the honey pot and another between the two flowers to balance the design.
Add the Wobble Bee
It’s time to place your wobble spring.
- Attach your bee to the clouds using the homemade wobble you created earlier.
- Before securing it fully, gently test the wobble to ensure your bee moves freely. This interactive feature brings movement to your card.
Place the Sentiments and Butterflies
- Glue the “Hello” sentiment in the top left corner.
- Add one butterfly under the word “Hello” and place the second butterfly in the top right corner.
- Position the “Sending Love on Your Birthday” sentiment underneath the flowers.
Add Finishing Details
- Use your black fine liner to draw a curved flight path from the bee’s feet upwards towards its wing.
- Add a few red heart embellishments around the bee to finish the design.
Attach Everything to Your Card Base
Once everything is in place, glue the completed panel onto your slimline card base.
The front of your interactive bee birthday card is finished.

Step 7 – Finish Your Bee Birthday Card with a Simple Inside Detail
Add a small detail to the inside of your handmade bee card. This connects the front design to the inside and gives space for your message.
Materials You Need
- White cardstock (10 cm x 20.5 cm)
- Winnie Sunshine Delight digital stamp (using the flowers)
Create the Inside Panel
Print the flower with the butterfly from the Winnie Sunshine Delight digital stamp. Adjust the size to fit on the inside panel.
Colour to Match
Colour the flower using the same alcohol marker combinations as on the front. This keeps the design consistent. The soft colours bring the bee-themed birthday card together without overwhelming the inside.
Assemble
Glue the finished panel inside your slimline card base. The inside is ready for your personal note.
Let’s Get Creative Together
Now it’s your turn to make an interactive wobble bee card. You can follow the same steps or change the colours and stamps to match your style. Feel free to experiment. That’s how you make the card yours.
I look forward to seeing what you create.
More interactive slimline card inspiration

Polkadoodles products in the spotlight
Too good to bee basket heart digital stamp

Winnie Sunshine Delight Little Friends

Rebel Messages

Birthday Greetings and Sentiments

Distress Ink Mowed Lawn

I would like to enter my card in the following challenges
- Unicorn Challenge Blog: Not square
- Craft Rocket Challenges: No design Paper
- We Love Stamping: Nature inspired or anything goes
- A Perfect Time To Craft Open Challenge: Anything goes
- Crafts Galore Encore Challenge Blog: Anything goes
- Critter Crazy CHALLENGE BLOG: Anything goes + featured critter
- Crafty Animals: Anything goes + must use an animal